Nicla Sense ME User Manual
Learn about the hardware and software features of the Arduino® Nicla Sense ME.
Overview
This user manual will guide you through a practical journey covering the most interesting features of the Arduino Nicla Sense ME. With this user manual, you will learn how to set up, configure and use this Arduino board.
Hardware and Software Requirements
Hardware Requirements
- Nicla Sense ME (x1)
- Micro USB cable (x1)
Software Requirements
- Arduino IDE 1.8.10+, Arduino IDE 2.0+, or Arduino Web Editor
- To create custom Machine Learning models, the Machine Learning Tools add-on integrated into the Arduino Cloud is needed. In case you do not have an Arduino Cloud account, you will need to create one first.
Product Overview
The Arduino® Nicla Sense ME is one of the most compact designs of the Arduino portfolio, housing an array of high-quality industrial-grade sensors in a remarkably small package. This versatile device allows you to accurately monitor essential process parameters like temperature, humidity, and motion, and share data through Bluetooth® Low Energy connectivity, enabling endless low-power smart sensing applications.
Board Architecture Overview
The Nicla Sense ME features a robust and efficient architecture that integrates a range of sensors packed into a tiny footprint. It features four industrial grade Bosch sensors that can accurately measure rotation, acceleration, pressure, humidity, temperature, air quality and CO2 levels.
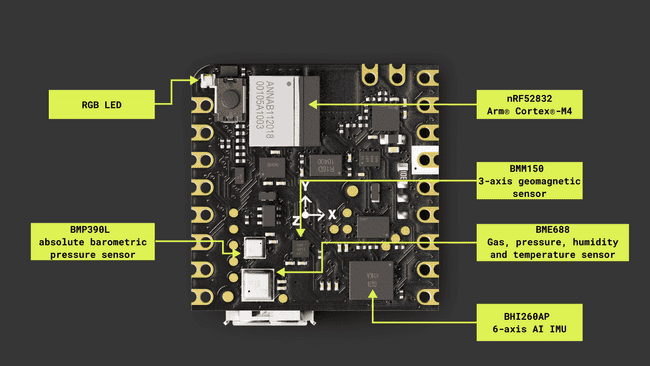
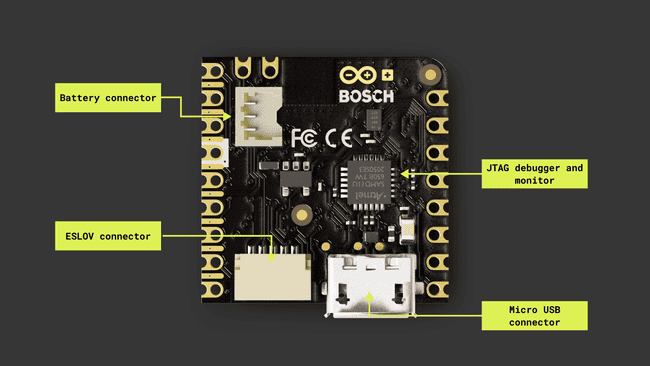
Here is an overview of main components of the board, as shown in the images above:
- Microcontroller: at the heart of the Nicla Sense ME is the nRF52832, a powerful and versatile System-on-Chip (SoC) from Nordic® Semiconductor. The nRF52832 is built around a 32-bit Arm® Cortex®-M4 processor running at 64 MHz.
- Onboard advanced motion sensors: the board features the BHI260AP, a smart IMU that includes a 3-axis accelerometer and a 3-axis gyroscope. It is trained with Machine Learning algorithms able to perform step counting, position tracking, and activity recognition. The board also features the BMM150, a compact geomagnetic sensor from Bosch® Sensortec including a 3-axis magnetometer.
- Onboard environment sensors: the Nicla Sense ME is equipped with the BME688, this is the first gas sensor with Artificial Intelligence (AI) and integrated high-linearity and high-accuracy pressure, humidity and temperature sensors. The gas sensor can detect Volatile Organic Compounds (VOCs), volatile sulfur compounds (VSCs) and other gases, such as carbon monoxide and hydrogen, in the part per billion (ppb) range.
- Wireless connectivity: the board supports Bluetooth® Low Energy connectivity, provided by the ANNA-B112 module developed by u-blox®. This compact, high-performance Bluetooth® Low Energy module allows the Nicla Sense ME to communicate wirelessly with other devices and systems.
- Power management: the Nicla Sense ME is designed for ultra-low power operations, with efficient power management features that ensure minimal energy consumption even when using always-on motion recognition and environment analysis sensors. The Nicla Sense ME features the BQ25120 from Texas Instruments®, a highly integrated battery charge management integrated circuit (IC) designed for wearables and Internet of Things (IoT) devices.
Board Core and Libraries
The Arduino Mbed OS Nicla Boards core contains the libraries and examples you need to work with the board's components, such as its IMU, magnetometer, and environment sensor. To install the Nicla boards core, navigate to Tools > Board > Boards Manager or click the Boards Manager icon in the left tab of the IDE. In the Boards Manager tab, search for
Nicla Sense MEArduino Mbed OS Nicla Boards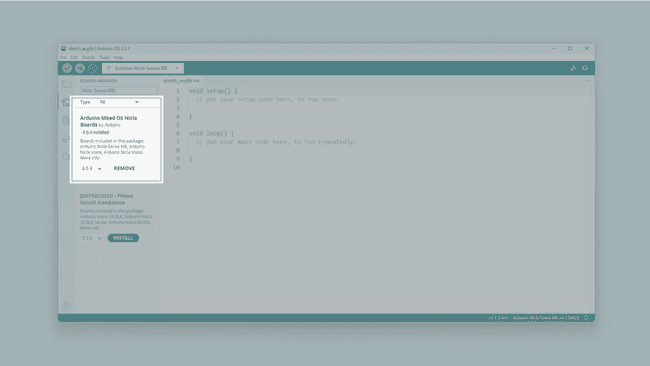
Pinout
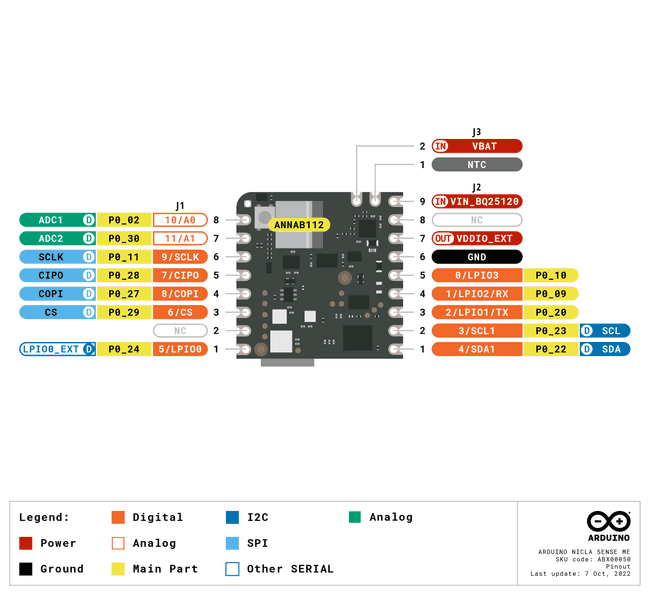
The full pinout is available and downloadable as PDF from the link below:
Datasheet
The complete datasheet is available and downloadable as PDF from the link below:
Schematics
The complete schematics are available and downloadable as PDF from the link below:
STEP Files
The complete STEP files are available and downloadable from the link below:
First Use
Powering the Board
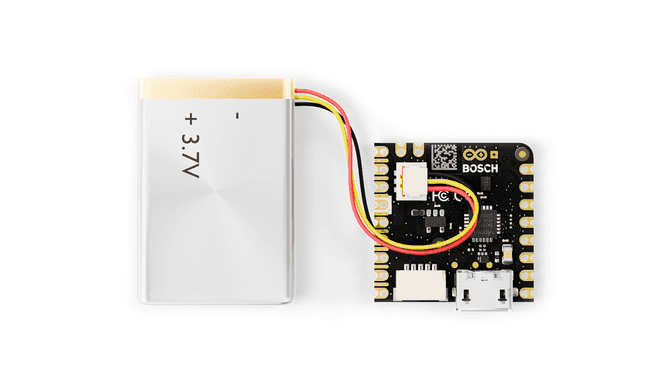
The Nicla Sense ME can be powered by:
- A Micro USB cable (not included).
- An external 5V power supply connected to
pin (please, refer to the board pinout section of the user manual).VIN_BQ25120 - A 3.7V Lithium Polymer (Li-Po) battery connected to the board through the onboard battery connector; the manufacturer part number of the battery connector is BM03B-ACHSS and its matching receptacle manufacturer part number is ACHR-03V-S. The recommended minimum battery capacity for the Nicla Sense ME is 200 mAh. A Li-Po battery with an integrated NTC thermistor is also recommended for thermal protection.
- The onboard ESLOV connector, which has a dedicated 5V power line.
Hello World Example
Let's program the Nicla Sense ME with the classic
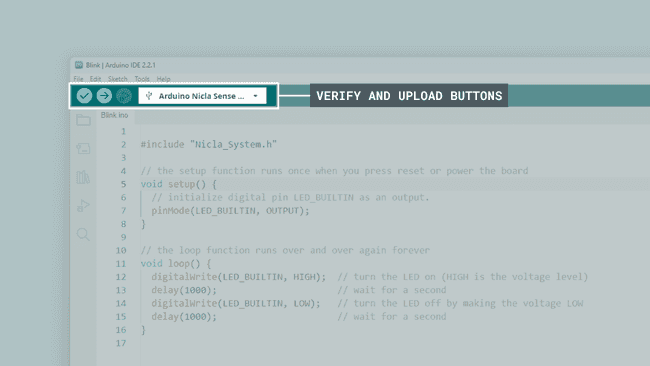
hello worldBlinkCopy and paste the code below into a new sketch in the Arduino IDE.
1#include "Nicla_System.h"2
3void setup() {4 // Initialize LED_BUILTIN as an output (this will turn on the LED)5 pinMode(LED_BUILTIN, OUTPUT);6}7
8void loop() {9 // Turn the built-in LED off10 digitalWrite(LED_BUILTIN, HIGH);11 delay(1000);12 // Turn the built-in LED on13 digitalWrite(LED_BUILTIN, LOW);14 delay(1000);15}For the Nicla Sense ME, the
LED_BUILTINTo upload the code to the Nicla Sense ME, click the Verify button to compile the sketch and check for errors; then click the Upload button to program the board with the sketch.
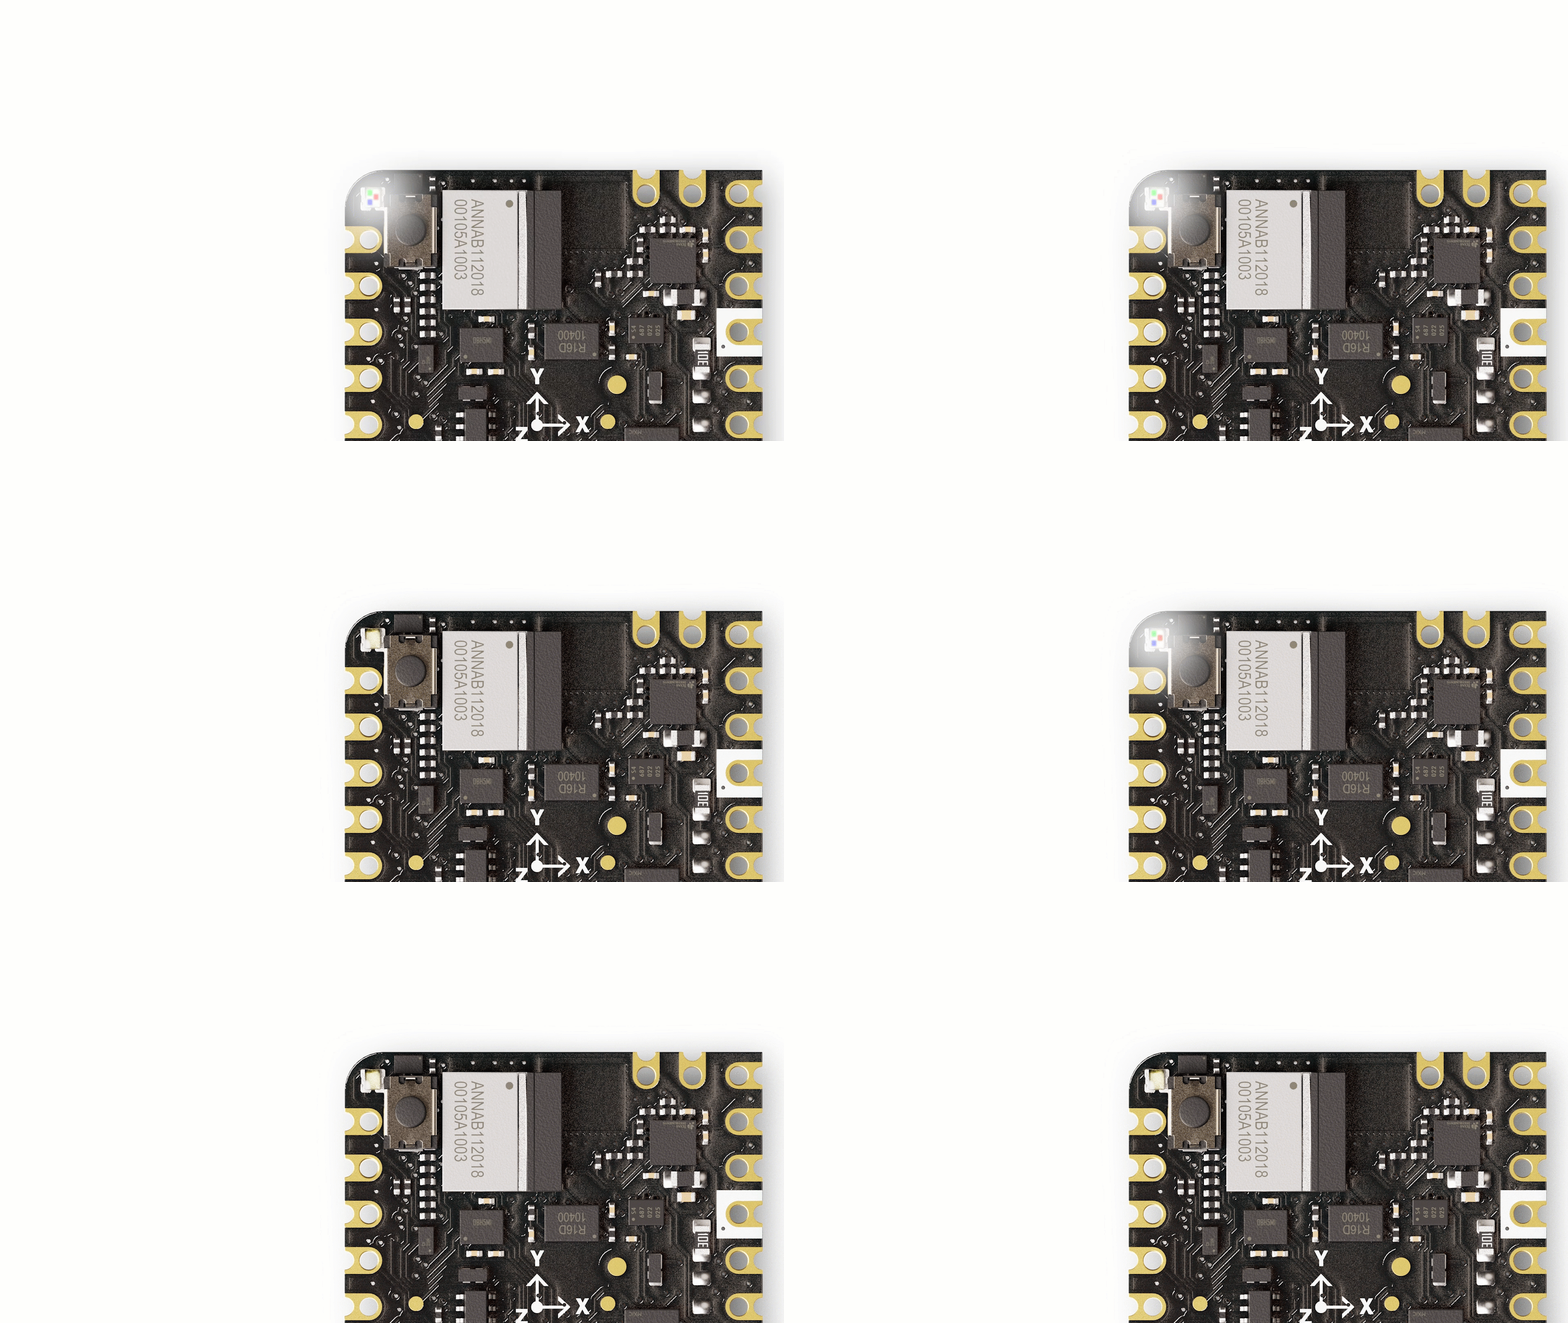
You should now see all the LEDs of the built-in RGB LED turn on for one second, then off for one second, repeatedly.
Battery Charging
One of the characteristic features of the Nicla Sense ME is power management, the BQ25120 battery charger IC is configurable by the user, which means that its charging parameters can be customized by software. We listed the main ones below:
Enable charging: If you are powering the board with a rechargeable battery, you may want it to be recharged, the IC lets you enable the charging function by calling
.nicla::enableCharging()Battery charging current: A safe default charging current value that works for most common LiPo batteries is 0.5C, which means charging at a rate equal to half of the battery's capacity. For example, a 200mAh battery could be charged at 100mA (0.1A).
The desired current must be set as the parameter of the enabling function:
.nicla::enableCharging(100)When the function parameter is left blank, the default current is 20mA.
Battery NTC: If your battery has an NTC to measure its temperature, you can enable it by calling this function:
, if not, set the argument to false.nicla::setBatteryNTCEnabled(true)Battery maximum charging time: To get an estimation of the charging time, you can use the following formula:
Charging time (in hours) = (Battery capacity in mAh) / (0.8 * Charging current in mA)This formula takes into account that the charging process is approximately 80% efficient (hence the 0.8 factor). This is just a rough estimate, and actual charging time may vary depending on factors like the charger, battery quality, and charging conditions.
To set a charging time of nine hours, define it as follows:
nicla::configureChargingSafetyTimer (ChargingSafetyTimerOption::NineHours)Get the battery voltage: To monitor the battery voltage you just need to store the returned value of the following function in a float variable:
float currentVoltage = nicla::getCurrentBatteryVoltage();Get the power IC operating status: In order to know if the battery is fully charged, charging, or presents any error, you can check its status using this code block:
1auto operatingStatus = nicla::getOperatingStatus();2
3 switch(operatingStatus) {4 case OperatingStatus::Charging:5 nicla::leds.setColor(255,100,0); // Yellow6 break;7 case OperatingStatus::ChargingComplete:8 nicla::leds.setColor(green);9
10 // This will stop further charging until enableCharging() is called again.11 nicla::disableCharging();12 break;13 case OperatingStatus::Error:14 nicla::leds.setColor(red);15 break;16 case OperatingStatus::Ready:17 nicla::leds.setColor(blue);18 break;19 default:20 nicla::leds.setColor(off);21 break;22 }To extend your knowledge on this topic, refer to the board examples by navigating to "File > Examples > Nicla_Sense_System", and choose between both examples:
NiclaSenseME_BatteryStatusNiclaSenseME_BatteryChargingSimple
Pins
Analog Pins
The Nicla Sense ME has two analog input pins, mapped as follows:
| Microcontroller Pin | Arduino Pin Mapping |
|---|---|
| ADC1/P0_02 | A0 |
| ADC2/P0_30 | A1 |
Both pins can be used through the built-in functions of the Arduino programming language.
Nicla boards ADC can be configured to 8, 10 or 12 bits defining the argument of the following function respectively (default is 10 bits):
1analogReadResolution(12); // ADC resolution set to 12 bits (0-4095)The Nicla boards ADC reference voltage is fixed to 1.8V, this means that it will map the ADC range from 0 to 1.8 volts.
The example code shown below reads the analog input value from a potentiometer connected to
A01#include "Nicla_System.h"2
3int sensorPin = A0; // select the input pin for the potentiometer4int sensorValue = 0; // variable to store the value coming from the sensor5
6void setup() {7
8 analogReadResolution(12); // ADC bits configuration9 nicla::begin(); // Nicla peripherals initialization, this enables the VDDIO_EXT 3.3V output.10 Serial.begin(115200); // Serial initialization11}12
13void loop() {14 // read the value from the sensor:15 sensorValue = analogRead(sensorPin);16 // print the value17 Serial.println(sensorValue);18 delay(1000);19}The ADC inputs support 3.3V even when the ADC reference is 1.8V. In this perspective, the ADC will not sense any change from 1.8V and above.
Digital Pins
The Nicla Sense ME has twelve digital pins, mapped as follows:
| Microcontroller Pin | Arduino Pin Mapping |
|---|---|
| P0_10 | 0 |
| P0_09 | 1 |
| P0_20 | 2 |
| P0_23 | 3 |
| P0_22 | 4 |
| P0_24 | 5 |
| P0_29 | 6 |
| P0_27 | 7 |
| P0_28 | 8 |
| P0_11 | 9 |
| P0_02 | A0 |
| P0_30 | A1 |
Notice that analog pins
A0A1P0_02P0_30The digital pins of the Nicla Sense ME can be used as inputs or outputs through the built-in functions of the Arduino programming language.
The Nicla Sense ME digital I/O's are low power, so to drive output devices like LEDs, resistive loads, buzzers, etc, it is recommended to use a MOSFET driver or a buffer to guarantee the required current flow. Learn more about the Nicla I/O's considerations here.
The configuration of a digital pin is done in the
setup()pinMode()1// Pin configured as an input2pinMode(pin, INPUT);3
4// Pin configured as an output5pinMode(pin, OUTPUT);6
7// Pin configured as an input, internal pull-up resistor enabled8pinMode(pin, INPUT_PULLUP);The state of a digital pin, configured as an input, can be read using the built-in function
digitalRead()1// Read pin state, store value in a state variable2state = digitalRead(pin);The state of a digital pin, configured as an output, can be changed using the built-in function
digitalWrite()1// Set pin on2digitalWrite(pin, HIGH);3
4// Set pin off5digitalWrite(pin, LOW);The example code shown below uses digital pin
321// Define button and LED pin2int buttonPin = 2;3int ledPin = 3;4
5// Variable to store the button state6int buttonState = 0;7
8void setup() {9 // Configure button and LED pins10 pinMode(buttonPin, INPUT_PULLUP);11 pinMode(ledPin, OUTPUT);12
13 // Initialize Serial communication14 Serial.begin(115200);15}16
17void loop() {18 // Read the state of the button19 buttonState = digitalRead(buttonPin);20
21 // If the button is pressed, turn on the LED and print its state to the Serial Monitor22 if (buttonState == LOW) {23 digitalWrite(ledPin, HIGH);24 Serial.println("- Button is pressed. LED is on.");25 } else {26 // If the button is not pressed, turn off the LED and print to the Serial Monitor27 digitalWrite(ledPin, LOW);28 Serial.println("- Button is not pressed. LED is off.");29 }30
31 // Wait for 1000 milliseconds32 delay(1000);33}PWM Pins
Most digital and analog pins of the Nicla Sense ME can be used as PWM (Pulse Width Modulation) pins. This functionality can be used with the built-in function
analogWrite()1analogWrite(pin, value);By default, the output resolution is 8 bits, so the output value should be between 0 and 255. To set a greater resolution, do it using the built-in function
analogWriteResolution1analogWriteResolution(bits);Using this function has some limitations, for example, the PWM signal frequency is fixed at 500 Hz, and this could not be ideal for every application.
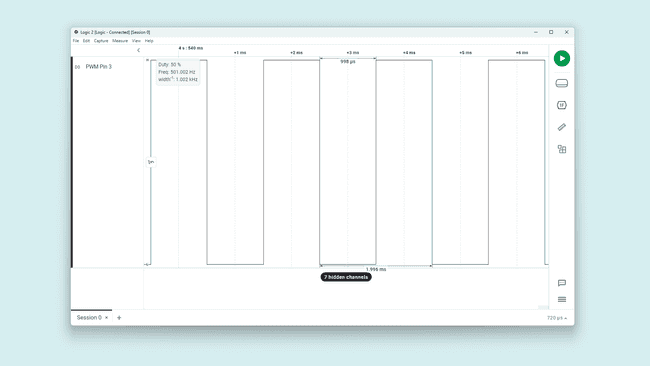
If you need to work with a higher frequency PWM signal, you must do it by working with the PWM peripheral at a lower level as shown in the example code below:
1#include "nrfx_pwm.h"2
3static nrfx_pwm_t pwm1 = NRFX_PWM_INSTANCE(0);4
5static uint16_t /*const*/ seq1_values[] = {0};6
7static nrf_pwm_sequence_t seq1 = {8 .values = { .p_common = seq1_values },9 .length = NRF_PWM_VALUES_LENGTH(seq1_values),10 .repeats = 0,11 .end_delay = 012};13
14void setup() {15
16 nrfx_pwm_config_t config1 = {17 .output_pins = {18 32 + 23, // Nicla Sense ME pin 3 = pin P0_23 in the ANNAB112 MCU19 },20 .irq_priority = APP_IRQ_PRIORITY_LOWEST,21 .base_clock = NRF_PWM_CLK_1MHz, // 1 us period22 .count_mode = NRF_PWM_MODE_UP,23 .top_value = 1000, // PWM counter limit, this will set the final output frequency 1MHz / 1000 = 1KHz24 .load_mode = NRF_PWM_LOAD_COMMON,25 .step_mode = NRF_PWM_STEP_AUTO,26 };27
28 nrfx_pwm_init(&pwm1, &config1, NULL);29
30 (*seq1_values) = 500; // this variable sets the signal duty cycle, for a 50% we are using 500. (1000 / 500 = 1/2)31 (void)nrfx_pwm_simple_playback(&pwm1, &seq1, 1, NRFX_PWM_FLAG_LOOP);32}33
34void loop() {35
36}The code above results in a 1KHz square waveform with a 50% duty cycle as in the image below. The frequency is defined by the
.base_clock.top_valueseq1_values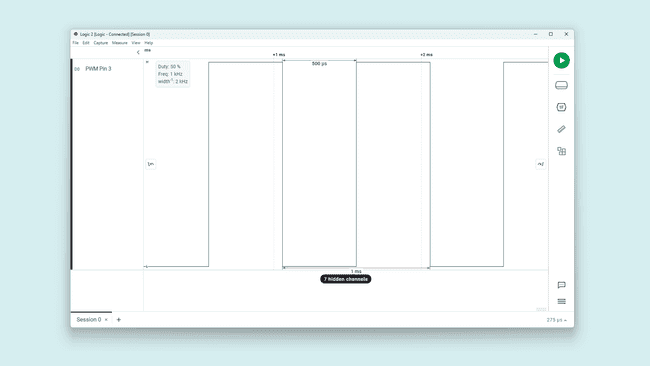
Onboard Sensors
The Nicla Sense ME boards come with various onboard sensors that allow you to capture and process environmental and motion data via a 6-axis IMU, a 3-axis magnetometer and a gas, temperature, humidity and pressure sensor. The onboard sensors can be used for developing various applications, such as activity recognition, and environmental monitoring.
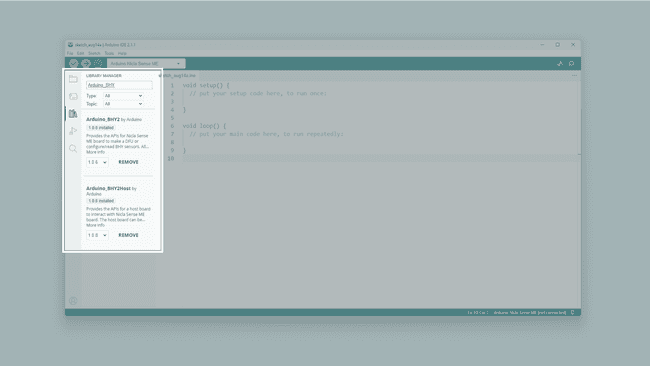
To read from any of these sensors you need to install the Arduino_BHY2 and Arduino_BHY2Host libraries. These can be found in the Arduino IDE library manager. To do so in the IDE, select it from the left side menu, now search for Arduino_BHY and click on the install button.
IMU
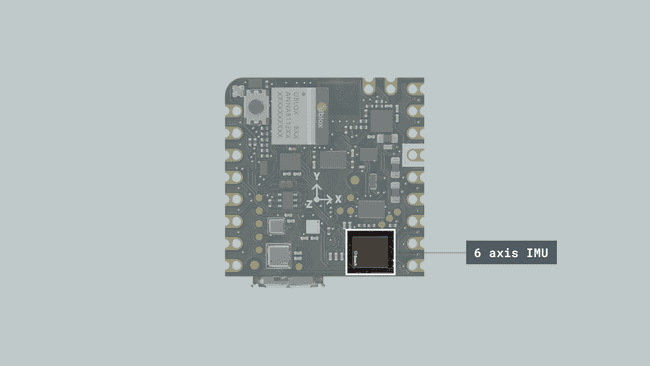
The Nicla Sense ME features an advanced IMU, which allows the board to sense motion. The IMU on the board is the BHI260AP from Bosch®. It consists of a 3-axis accelerometer and a 3-axis gyroscope. They can provide information about the board's motion, orientation, and rotation in a 3D space. The BHI260AP, apart from being able to do raw movement measurements, is equipped with pre-trained machine-learning models that recognize activities right out of the box.
The example code below shows how to get acceleration and angular velocity data from the onboard IMU and stream it to the Arduino IDE Serial Monitor and Serial Plotter.
1#include "Arduino.h"2#include "Arduino_BHY2.h"3
4SensorXYZ accel(SENSOR_ID_ACC);5SensorXYZ gyro(SENSOR_ID_GYRO);6
7
8void setup() {9 Serial.begin(115200);10 while (!Serial)11 ;12
13 BHY2.begin();14
15 accel.begin();16 gyro.begin();17}18
19void loop() {20 static auto printTime = millis();21
22 // Update function should be continuously polled23 BHY2.update();24
25 if (millis() - printTime >= 50) {26 printTime = millis();27
28 // Accelerometer values29 Serial.print("acc_X:");30 Serial.print(accel.x());31 Serial.print(",");32 Serial.print("acc_Y:");33 Serial.print(accel.y());34 Serial.print(",");35 Serial.print("acc_Z:");36 Serial.print(accel.z());37 Serial.print(",");38
39 // Gyroscope values40 Serial.print("gyro_X:");41 Serial.print(gyro.x());42 Serial.print(",");43 Serial.print("gyro_Y:");44 Serial.print(gyro.y());45 Serial.print(",");46 Serial.print("gyro_Z:");47 Serial.println(gyro.z());48 }49}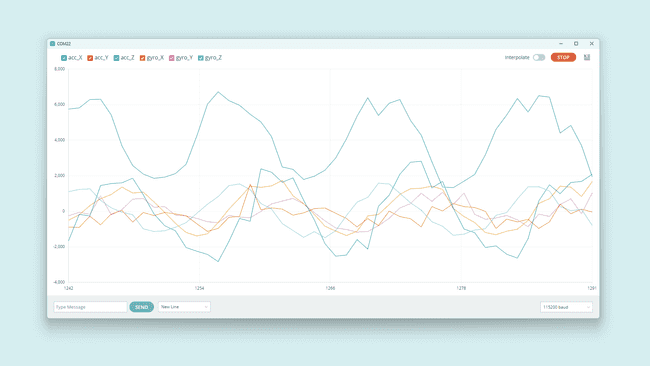
To take advantage of the IMU pre-trained ML capabilities, we can use the Activity Recognition class. The following example code enables your Nicla Sense ME to classify movements from different daily activities:
- Standing still
- Walking
- Running
- On bicycle
- In vehicle
- Tilting
- In vehicle still
1#include "Nicla_System.h"2#include "Arduino_BHY2.h"3
4SensorActivity active(SENSOR_ID_AR);5
6unsigned long previousMillis = 0; // will store last time the sensor was updated7
8const long interval = 1000;9
10void setup() {11
12 Serial.begin(115200);13 nicla::begin();14 BHY2.begin(NICLA_I2C);15 active.begin();16}17
18void loop() {19
20 BHY2.update();21
22 unsigned long currentMillis = millis();23
24 if (currentMillis - previousMillis >= interval) {25
26 previousMillis = currentMillis;27 Serial.println(String("Activity info: ") + active.toString());28
29 }30
31}Magnetometer
The Nicla Sense ME is equipped with an onboard magnetometer, which allows the board to sense orientation and magnetic fields. The BMM150 enables measurements of the magnetic field in three perpendicular axes. Based on Bosch’s proprietary FlipCore technology, the performance and features of BMM150 are carefully tuned to perfectly match the demanding requirements of 3-axis mobile applications such as electronic compass, navigation, or augmented reality.
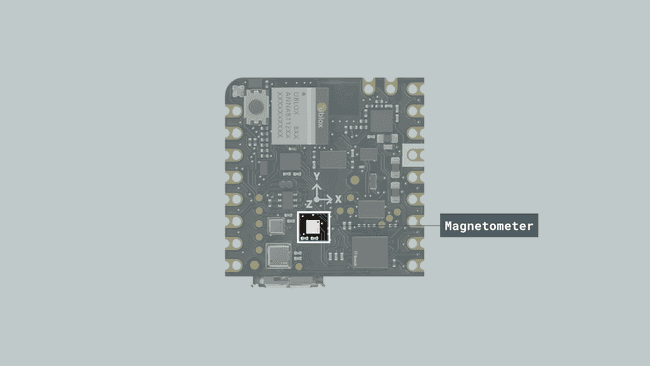
In the example code below, the magnetometer is used as a compass measuring the heading orientation in degrees.
1#include "Nicla_System.h"2#include "Arduino_BHY2.h"3#include "Math.h"4
5SensorXYZ magnetometer(SENSOR_ID_MAG);6
7float heading = 0;8
9unsigned long previousMillis = 0; // will store last time the sensor was updated10
11const long interval = 1000;12
13void setup() {14
15 Serial.begin(115200);16 nicla::begin();17 BHY2.begin(NICLA_I2C);18 magnetometer.begin();19
20}21
22void loop() {23 BHY2.update();24
25 unsigned long currentMillis = millis();26
27 if (currentMillis - previousMillis >= interval) {28
29 previousMillis = currentMillis;30
31 heading = round(atan2(magnetometer.x(), magnetometer.y()) * 180.0 / PI);32 Serial.println(String(heading) + "º");33 }34}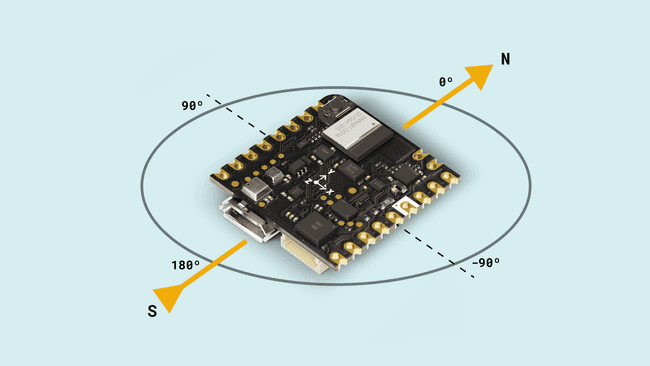
Environmental Sensor
The Arduino Nicla Sense ME can perform environmental monitoring via the Bosch BME688 sensor. This enables pressure, humidity, temperature as well as gas detection. The gas sensor can detect Volatile Organic Compounds (VOCs), volatile sulfur compounds (VSCs), and other gases, such as carbon monoxide and hydrogen, in the part per billion (ppb) range.
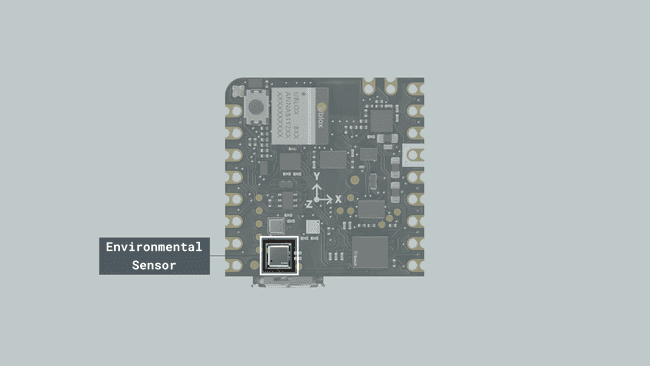
The BME688 lets you measure pressure, humidity, temperature, and gas sensor resistance, thanks to a proprietary solution from Bosch called BSEC. In addition, the system is capable of providing numerous useful outputs such as:
- Index for Air Quality (IAQ)
- CO2 equivalents
- b-VOC equivalents
- Gas %
To extract these measurements from the sensor use the below example code:
1#include "Nicla_System.h"2#include "Arduino_BHY2.h"3
4
5unsigned long previousMillis = 0; // will store last time the sensor was updated6
7const long interval = 1000;8
9SensorBSEC bsec(SENSOR_ID_BSEC); // 4-in-1 sensor.10
11void setup() {12
13 Serial.begin(115200);14 nicla::begin();15 BHY2.begin(NICLA_I2C);16 bsec.begin();17}18
19void loop() {20
21 BHY2.update();22
23 unsigned long currentMillis = millis();24
25 if (currentMillis - previousMillis >= interval) {26
27 previousMillis = currentMillis;28
29 Serial.println(bsec.toString());30 }31}When using the BSEC sensor class, be aware that the system will need several minutes to start providing IAQ and CO2 measurements due to some mandatory internal calibrations.
Pressure Sensor
The Nicla Sense ME can accurately measure pressure thanks to its digital pressure sensor (BMP390). Its operating range is from 300 to 1250 hPa, which makes it perfect for a variety of applications, including:
- Weather forecast
- Outdoor navigation
- Vertical velocity indication
- Portable health care devices
- Fitness applications
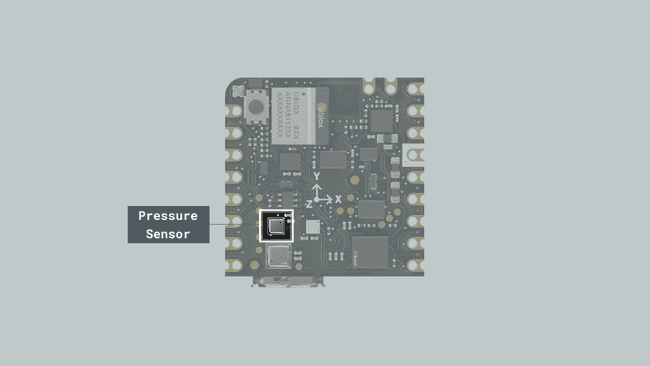
To use this sensor in standalone mode, you can leverage the example code below:
1#include "Nicla_System.h"2#include "Arduino_BHY2.h"3
4
5unsigned long previousMillis = 0; // will store last time the sensor was updated6
7const long interval = 1000;8
9Sensor pressure(SENSOR_ID_BARO);10
11void setup() {12
13 Serial.begin(115200);14 nicla::begin();15 BHY2.begin(NICLA_I2C);16 pressure.begin();17}18
19void loop() {20
21 BHY2.update();22
23 unsigned long currentMillis = millis();24
25 if (currentMillis - previousMillis >= interval) {26
27 previousMillis = currentMillis;28
29 Serial.println(String(pressure.value()) + " hPa");30 }31}To learn how to work with every sensor class and predefined objects to get all the needed readings, go to our Nicla Sense ME Cheat Sheet.
On-Board Sensors WebBLE Dashboard
A very interesting way to test the Nicla Sense ME onboard sensors all at once is through the WebBLE dashboard demo.
Enable your PC Bluetooth connection and go to the dashboard link, add this firmware to your sketchbook in the Arduino Cloud or download it to use it locally.
Upload the code to your Nicla Sense ME and now you are ready to start monitoring the variables through the WebBLE dashboard.
Click on "CONNECT", search for your board and pair it.
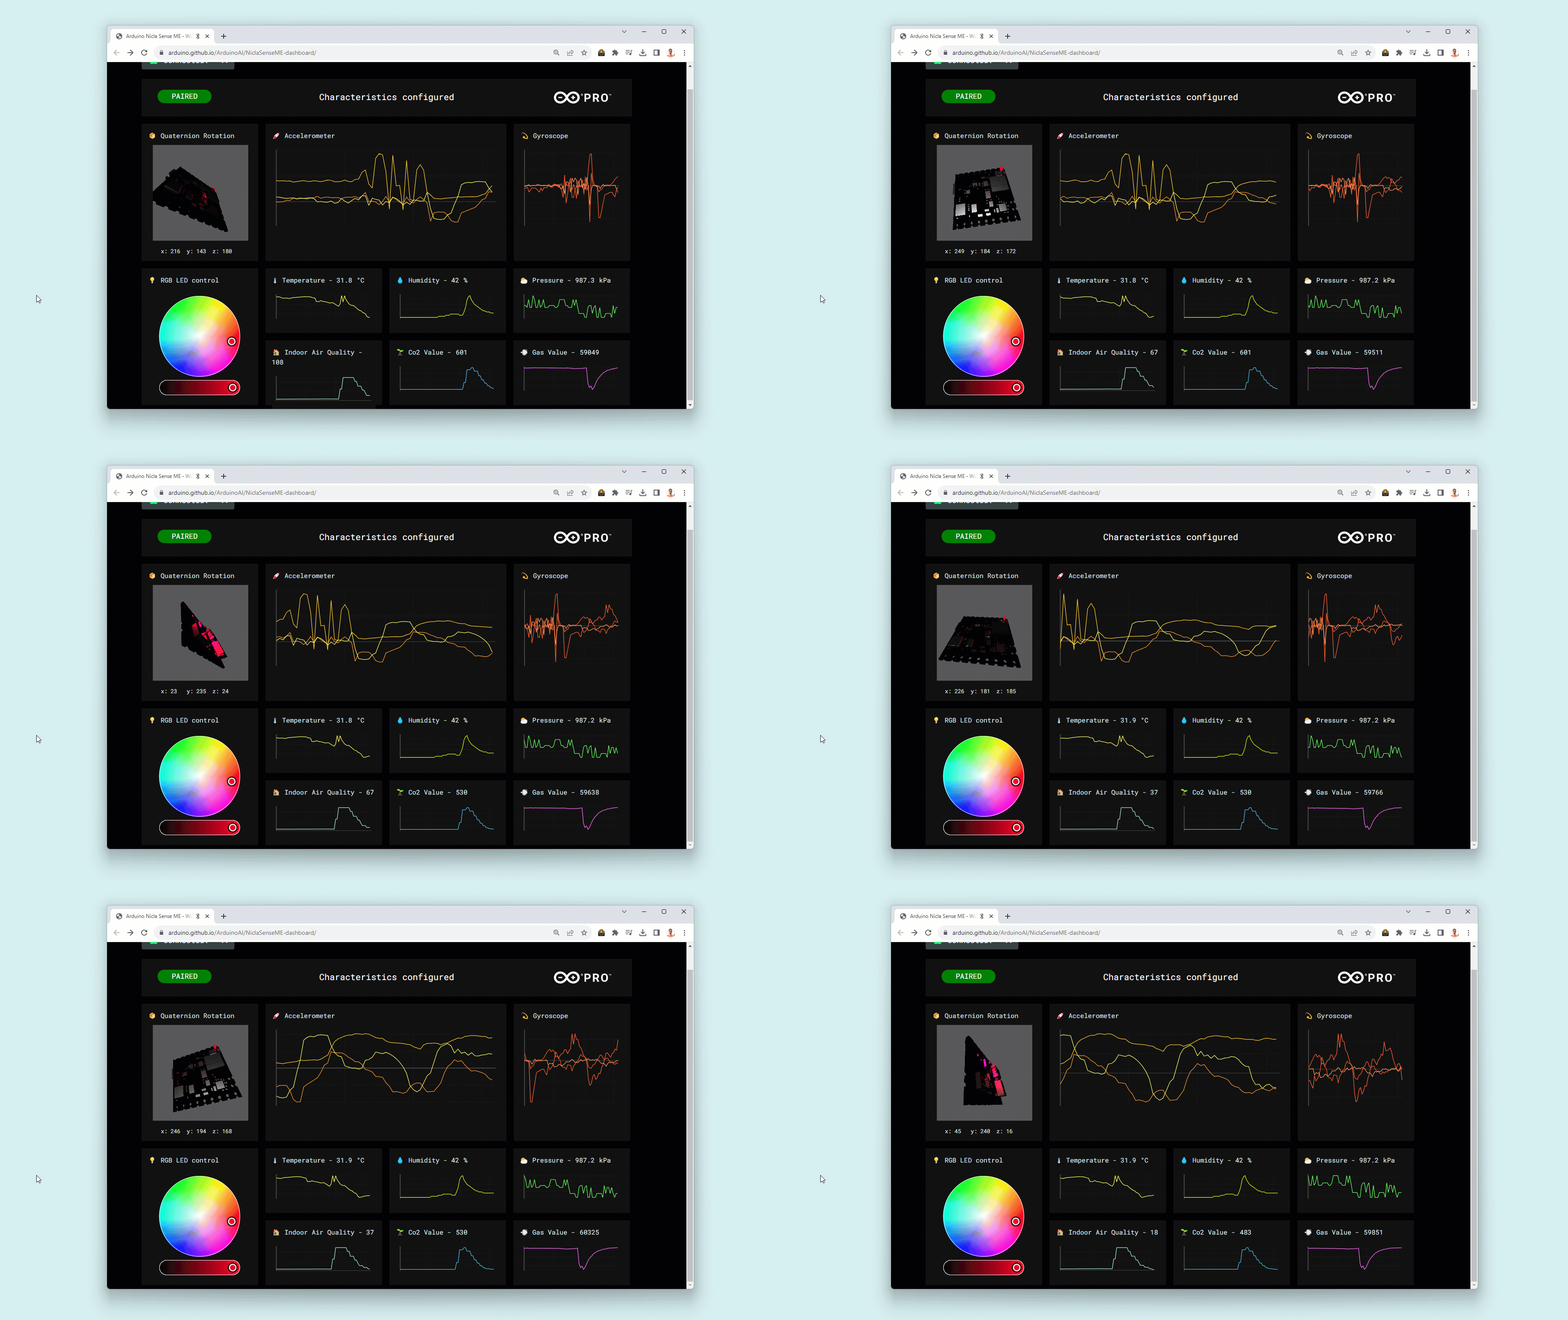
Follow this dedicated guide to get more details.
Actuators
RGB LED
The Nicla Sense ME features a built-in I2C RGB LED that can be a visual feedback indicator for the user. The LED is connected through the boards' I2C port; therefore, specific functions must be used to operate the LED colors.
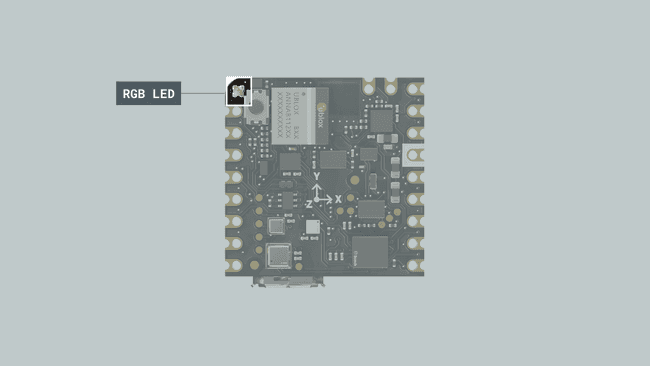
To use the RGB LED, include the
Nicla System1// Include the Nicla System header to access the built-in RGB LED functions2#include "Nicla_System.h"Since the functions are scoped under a class name called
niclasetup()1void setup() {2 // Initialize the Nicla system and the built-in RGB LED3 nicla::begin();4 nicla::leds.begin();5}The LED can be set to the desired RGB value using red, green and blue components or by using one of the following predefined colors:
- off
- red
- green
- blue
- yellow
- magenta
- cyan
To set the LED to a predefined color (e.g. green or blue):
1// Set the LED color to green, wait for 1000 milliseconds2nicla::leds.setColor(green);3delay(1000);4
5// Set the LED color to blue, wait for 1000 milliseconds6nicla::leds.setColor(blue);7delay(1000);To turn off the built-in RGB LED:
1// Turn off the LED2nicla::leds.setColor(off);You can also choose a value between 0 and 255 for each color component (red, green, or blue) to set a custom color:
1// Define custom color values for red, green, and blue components2int red = 234;3int green = 72;4int blue = 122;5
6// Set the LED to the custom color, wait for 1000 milliseconds7nicla::leds.setColor(red, green, blue);8delay(1000);9
10// Turn off the LED and wait, wait for 1000 milliseconds11nicla::leds.setColor(off);12delay(1000);Here you can find a complete example code to blink the built-in I2C RGB LED of the Nicla Sense ME:
1// Include the Nicla System header to access the built-in RGB LED functions2#include "Nicla_System.h"3
4void setup() {5 // Initialize the Nicla system and the built-in RGB LED6 nicla::begin();7 nicla::leds.begin();8}9
10void loop() {11 // Set the LED color to red, wait for 1000 milliseconds12 nicla::leds.setColor(green);13 delay(1000);14
15 // Turn off the LED and wait, wait for 1000 milliseconds16 nicla::leds.setColor(off);17 delay(1000);18}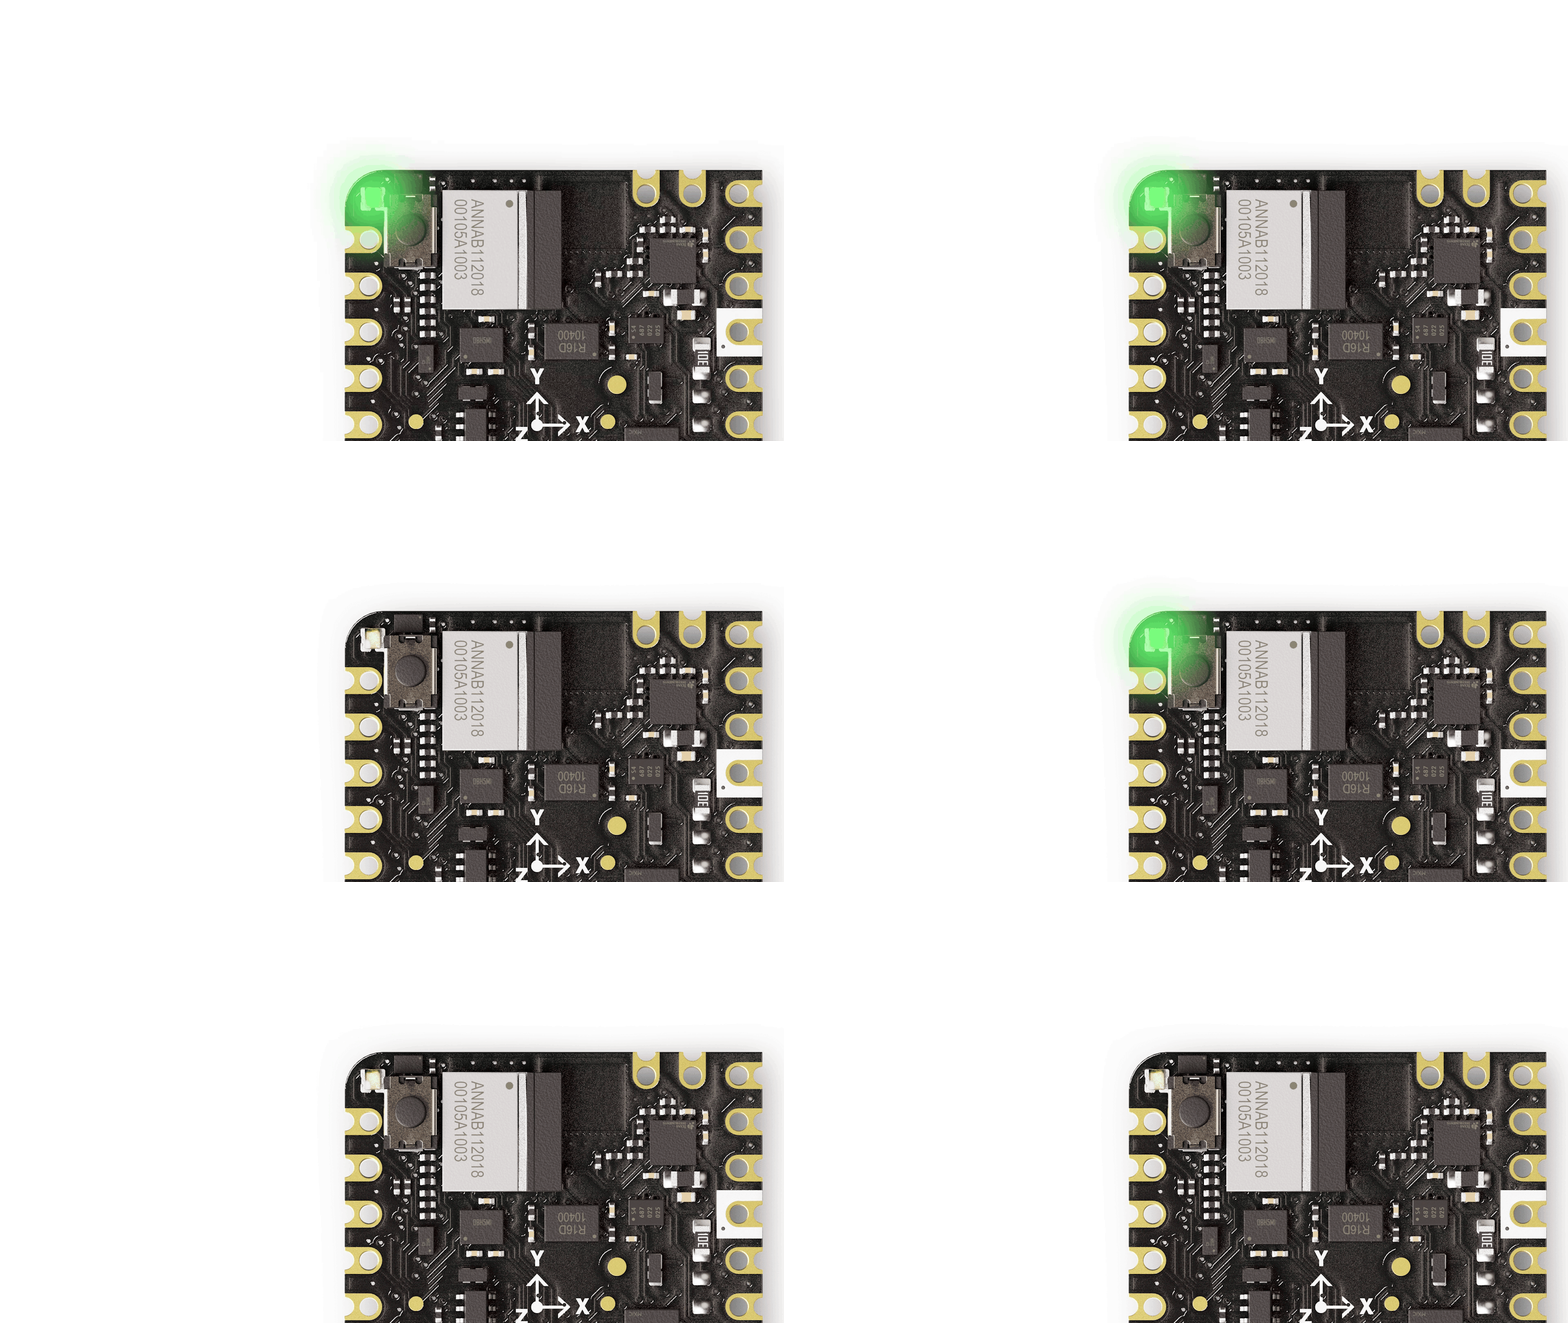
Communication
This section of the user manual covers the different communication protocols that are supported by the Nicla Sense ME board, including the Serial Peripheral Interface (SPI), Inter-Integrated Circuit (I2C), Universal Asynchronous Receiver-Transmitter (UART), and Bluetooth® Low Energy; communication via the onboard ESLOV connector is also explained in this section. The Nicla Sense ME features dedicated pins for each communication protocol, simplifying the connection and communication with different components, peripherals, and sensors.
SPI
The Nicla Sense ME supports SPI communication, which allows data transmission between the board and other SPI-compatible devices. The pins used in the Nicla Sense ME for the SPI communication protocol are the following:
| Microcontroller Pin | Arduino Pin Mapping |
|---|---|
| CS/P0_29 | SS or 6 |
| COPI/P0_27 | MOSI or 7 |
| CIPO/P0_28 | MISO or 9 |
| SCLK/P0_11 | SCK or 8 |
Please, refer to the board pinout section of the user manual to localize them on the board.
Include the
SPI1#include <SPI.h>In the
setup()CS1void setup() {2 // Set the chip select pin as output3 pinMode(SS, OUTPUT);4
5 // Pull the CS pin HIGH to unselect the device6 digitalWrite(SS, HIGH);7
8 // Initialize the SPI communication9 SPI.begin();10}To transmit data to an SPI-compatible device, you can use the following commands:
1// Replace with the target device's address2byte address = 0x35;3
4// Replace with the value to send5byte value = 0xFA;6
7// Pull the CS pin LOW to select the device8digitalWrite(SS, LOW);9
10// Send the address11SPI.transfer(address);12
13// Send the value14SPI.transfer(value);15
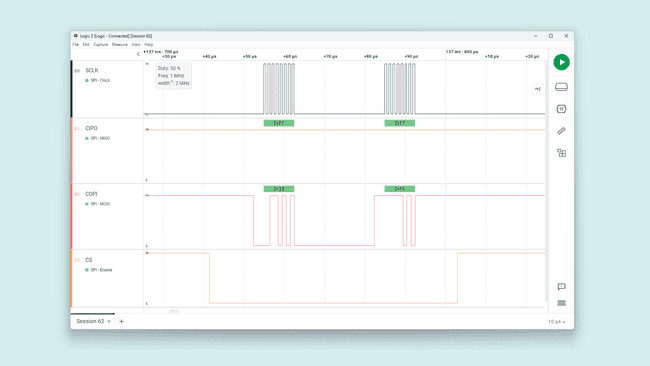
16// Pull the CS pin HIGH to unselect the device17digitalWrite(SS, HIGH);The example code above should output this:
I2C
The Nicla Sense ME supports I2C communication, which allows data transmission between the board and other I2C-compatible devices. The pins used in the Nicla Sense ME for the I2C communication protocol are the following:
| Microcontroller Pin | Arduino Pin Mapping |
|---|---|
| P0_23 | SCL or 3 |
| P0_22 | SDA or 4 |
Please, refer to the board pinout section of the user manual to localize them on the board. The I2C pins are also available through the Nicla Sense ME ESLOV connector.
To use I2C communication, include the
WireWire1#include <Wire.h>In the
setup()1// Initialize the I2C communication2Wire.begin();To transmit data to an I2C-compatible device, you can use the following commands:
1// Replace with the target device's I2C address2byte deviceAddress = 0x35;3
4// Replace with the appropriate instruction byte5byte instruction = 0x00;6
7// Replace with the value to send8byte value = 0xFA;9
10// Begin transmission to the target device11Wire.beginTransmission(deviceAddress);12
13// Send the instruction byte14Wire.write(instruction);15
16// Send the value17Wire.write(value);18
19// End transmission20Wire.endTransmission();The output data should look like the image below, where we can see the device address data frame:

To read data from an I2C-compatible device, you can use the
requestFrom()read()1// The target device's I2C address2byte deviceAddress = 0x1;3
4// The number of bytes to read5int numBytes = 2;6
7// Request data from the target device8Wire.requestFrom(deviceAddress, numBytes);9
10// Read while there is data available11while (Wire.available()) {12 byte data = Wire.read();13}UART
The pins used in the Nicla Sense ME for the UART communication protocol are the following:
| Microcontroller Pin | Arduino Pin Mapping |
|---|---|
| P0_09 | RX or 1 |
| P0_20 | TX or 2 |
Please, refer to the board pinout section of the user manual to localize them on the board.
To begin with UART communication, you will need to configure it first. In the
setup()1// Start UART communication at 115200 baud2Serial1.begin(115200);To read incoming data, you can use a
while()1// Variable for storing incoming data2String incoming = "";3
4void loop() {5 // Check for available data and read individual characters6 while (Serial1.available()) {7 // Allow data buffering and read a single character8 delay(2);9 char c = Serial1.read();10
11 // Check if the character is a newline (line-ending)12 if (c == '\n') {13 // Process the received data14 processData(incoming);15
16 // Clear the incoming data string for the next message17 incoming = "";18 } else {19 // Add the character to the incoming data string20 incoming += c;21 }22 }23}To transmit data to another device via UART, you can use the
write()1// Transmit the string "Hello world!2Serial1.write("Hello world!");You can also use the
printprintln()1// Transmit the string "Hello world!"2Serial1.print("Hello world!");3
4// Transmit the string "Hello world!" followed by a newline character5Serial1.println("Hello world!");Bluetooth® Low Energy
To enable Bluetooth® Low Energy communication on the Nicla Sense ME, you can use the ArduinoBLE library.
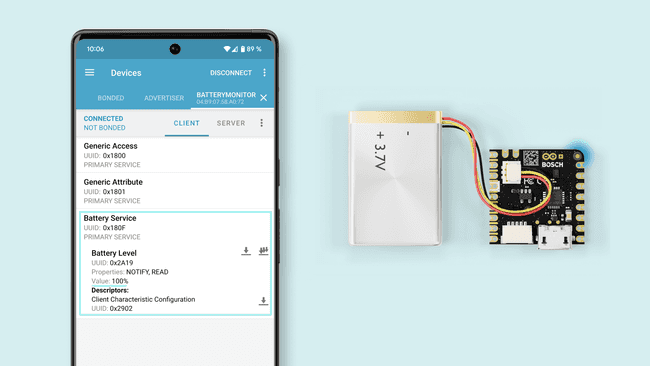
For this BLE application example, we are going to monitor the Nicla Sense ME battery level. Here is an example of how to use the ArduinoBLE library to achieve it:
1#include "Nicla_System.h"2#include <ArduinoBLE.h>3
4// Bluetooth® Low Energy Battery Service5BLEService batteryService("180F");6
7// Bluetooth® Low Energy Battery Level Characteristic8BLEUnsignedCharCharacteristic batteryLevelChar("2A19", // standard 16-bit characteristic UUID9 BLERead | BLENotify); // remote clients will be able to get notifications if this characteristic changes10
11int oldBatteryLevel = 0; // last battery level reading from analog input12long previousMillis = 0; // last time the battery level was checked, in ms13
14void blePeripheralDisconnectHandler(BLEDevice central) {15 nicla::leds.setColor(red);16 Serial.println("Device disconnected.");17}18
19void blePeripheralConnectHandler(BLEDevice central) {20 nicla::leds.setColor(blue);21 Serial.println("Device connected.");22}23
24void setup() {25 Serial.begin(9600); // initialize serial communication26 while (!Serial)27 ;28
29 // run this code once when Nicla Sense ME board turns on30 nicla::begin(); // initialize library31 nicla::leds.begin(); // initialize LEDs support32
33 nicla::setBatteryNTCEnabled(false); // Set to false if your battery doesn't have an NTC thermistor.34 nicla::enableCharging(100); // enable the battery charger and define the charging current in mA35
36 nicla::leds.setColor(green);37
38 // begin initialization39 if (!BLE.begin()) {40 Serial.println("starting BLE failed!");41
42 while (1)43 ;44 }45
46 /* Set a local name for the Bluetooth® Low Energy device47 This name will appear in advertising packets48 and can be used by remote devices to identify this Bluetooth® Low Energy device49 The name can be changed but maybe be truncated based on space left in advertisement packet50 */51 BLE.setLocalName("BatteryMonitor");52 BLE.setAdvertisedService(batteryService); // add the service UUID53 batteryService.addCharacteristic(batteryLevelChar); // add the battery level characteristic54 BLE.addService(batteryService); // Add the battery service55 batteryLevelChar.writeValue(oldBatteryLevel); // set initial value for this characteristic56 BLE.setEventHandler(BLEDisconnected, blePeripheralDisconnectHandler); // handler that fires when BLE is disconnected57 BLE.setEventHandler(BLEConnected, blePeripheralConnectHandler); // handler that fires when BLE is disconnected58
59 /* Start advertising Bluetooth® Low Energy. It will start continuously transmitting Bluetooth® Low Energy60 advertising packets and will be visible to remote Bluetooth® Low Energy central devices61 until it receives a new connection */62
63 // start advertising64 BLE.advertise();65
66 Serial.println("Bluetooth® device active, waiting for connections...");67}68
69void loop() {70 // wait for a Bluetooth® Low Energy central71 BLEDevice central = BLE.central();72
73 // if a central is connected to the peripheral:74 if (central) {75 Serial.print("Connected to central: ");76 // print the central's BT address:77 Serial.println(central.address());78
79 // check the battery level every 200ms80 // while the central is connected:81 while (central.connected()) {82 long currentMillis = millis();83 // if 200ms have passed, check the battery level:84 if (currentMillis - previousMillis >= 200) {85 previousMillis = currentMillis;86 updateBatteryLevel();87 }88 }89
90 Serial.print("Disconnected from central: ");91 Serial.println(central.address());92 }93}94
95void updateBatteryLevel() {96 /* Read the power management IC registers to retrieve the battery percentage97 */98
99 int batteryLevel = nicla::getBatteryVoltagePercentage(); // this command return the battery percentage100
101 if (batteryLevel != oldBatteryLevel) { // if the battery level has changed102 Serial.print("Battery Level % is now: "); // print it103 Serial.println(batteryLevel);104 batteryLevelChar.writeValue(batteryLevel); // and update the battery level characteristic105 oldBatteryLevel = batteryLevel; // save the level for next comparison106 }107}The example code shown above creates a Bluetooth® Low Energy service and characteristics according to the BLE standard for transmitting a battery percentage value read by Nicla Sense ME power management IC.
- The code begins by importing all the necessary libraries and defining the Bluetooth® Low Energy service and characteristics for a battery-level application.
| Description | ID |
|---|---|
| Battery Service | 180F |
| Battery Level Characteristic | 2A19 |
In the
function, the code initializes the Nicla Sense ME board and sets up the Bluetooth® Low Energy service and characteristics; then, it begins advertising the defined Bluetooth® Low Energy service.setup()A Bluetooth® Low Energy connection is constantly verified in the
function; when a central device connects to the Nicla Sense ME, its built-in LED is turned on blue. The code then enters into a loop that constantly reads the battery percent. It also prints it to the Serial Monitor and transmits it to the central device over the defined Bluetooth® Low Energy characteristic.loop()
Using the nRF Connect app (available for Android and iOS) you can easily connect to your Nicla Sense ME and monitor the battery level in real time.
ESLOV Connector
The Nicla Sense ME board features an onboard ESLOV connector meant as an extension of the I2C communication bus. This connector simplifies the interaction between the Nicla Sense ME and various sensors, actuators, and other modules, without soldering or wiring.
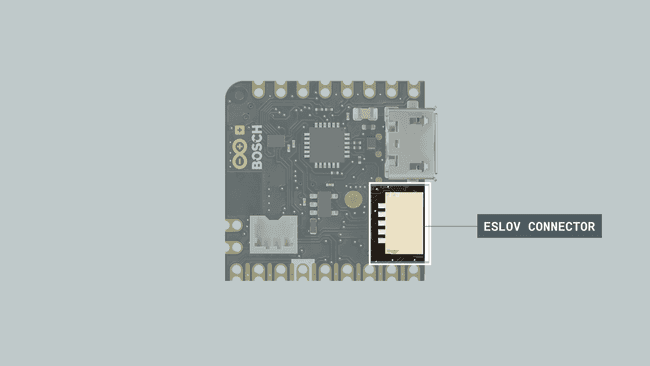
The ESLOV connector is a small 5-pin connector with a 1.00 mm pitch; the mechanical details of the connector can be found in the connector's datasheet.
The manufacturer part number of the ESLOV connector is SM05B-SRSS and its matching receptacle manufacturer part number is SHR-05V-S-B.
The pin layout of the ESLOV connector is the following:
- VCC_IN (5V input)
- INT
- SCL
- SDA
- GND
Arduino Cloud
The Nicla Sense ME does not have built-in Wi-Fi®, so it can not be directly connected to the internet. For this, we need to use a Wi-Fi® capable Arduino board as a host for the Nicla.
In this example, a Portenta C33 will be used as a gateway to forward Nicla Sense ME sensors data to the Arduino Cloud.
Nicla Sense ME Setup
The Nicla Sense ME will be listening to the Host board to send back the required data. This is all automated via the libraries Arduino_BHY2 and Arduino_BHY2Host.
The code is available inside the examples provided with the Arduino_BHY2 Library. Open it by going to Examples > Arduino_BHY2 > App.ino.
1#include "Arduino.h"2#include "Arduino_BHY2.h"3
4// Set DEBUG to true in order to enable debug print5#define DEBUG false6
7void setup()8{9#if DEBUG10 Serial.begin(115200);11 BHY2.debug(Serial);12#endif13
14 BHY2.begin(); // this initialization enables the ESLOV and BLE communication15}16
17void loop()18{19 // Update and then sleep20 BHY2.update(100);21}Upload the sketch above to the Nicla Sense ME using the Arduino IDE.
Arduino Cloud Setup
To start using the Arduino Cloud, we first need to log in or sign up.
Once in, it is time to configure your Portenta C33. For this, follow this section on the Portenta C33 user manual.
With a Thing already created, add a variable, in this case, "temperature" float type.
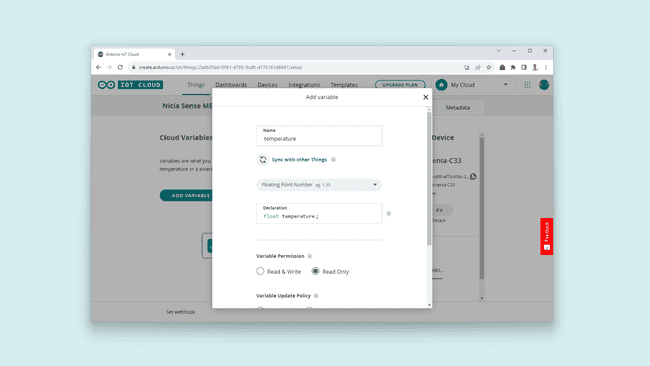
Once the variable is added, let's define the Wi-Fi® credentials for the board, for this, click on your Thing Network setting and add your Wi-Fi® SSID and password:

It is time to open the automatically generated sketch and modify the code. It should be replaced by the following:
1#include "thingProperties.h"2#include "Arduino_BHY2Host.h"3
4Sensor tempSensor(SENSOR_ID_TEMP); // Temperature sensor ID5
6void setup() {7 Serial.begin(9600);8 delay(1500);9
10 Serial.print("Configuring the Arduino Cloud");11 // Defined in thingProperties.h12 initProperties();13
14 // Connect to Arduino Cloud15 ArduinoCloud.begin(ArduinoIoTPreferredConnection);16
17 Serial.println("Connecting to the Arduino Cloud");18 while (ArduinoCloud.connected() != 1) {19 ArduinoCloud.update();20 delay(500);21 }22
23 delay(1500);24
25 Serial.println("Initialize the Nicla as a ESLOV connected device");26 BHY2Host.begin(false, NICLA_VIA_ESLOV); // use NICLA_VIA_BLE if a wireless connection is desired27
28 tempSensor.configure(1,0);29 temperature = tempSensor.value(); // take a first sample30}31
32void loop() {33
34 BHY2Host.update();35
36 temperature = tempSensor.value();37
38 ArduinoCloud.update();39
40 Serial.print("Temperature: ");41 Serial.println(temperature);42
43 delay(2000);44
45}If you are interested in using a different sensor from the onboard options of the Nicla Sense ME, check all the sensors IDs on this list
Portenta C33 Setup
Before uploading the code to the Portenta C33 code ready on the Arduino Cloud, let's connect everything together.
Using the ESLOV cable included with the Nicla Sense ME, connect both boards by their respective connectors as shown below:
Upload the code to the Portenta C33 by connecting it to your computer using a USB cable and clicking on the upload button in the IoT Cloud editor.
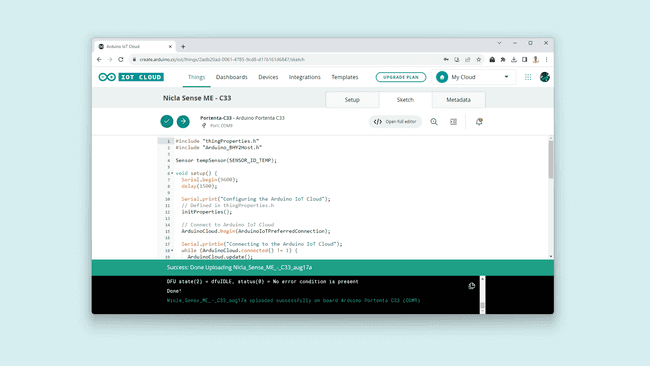
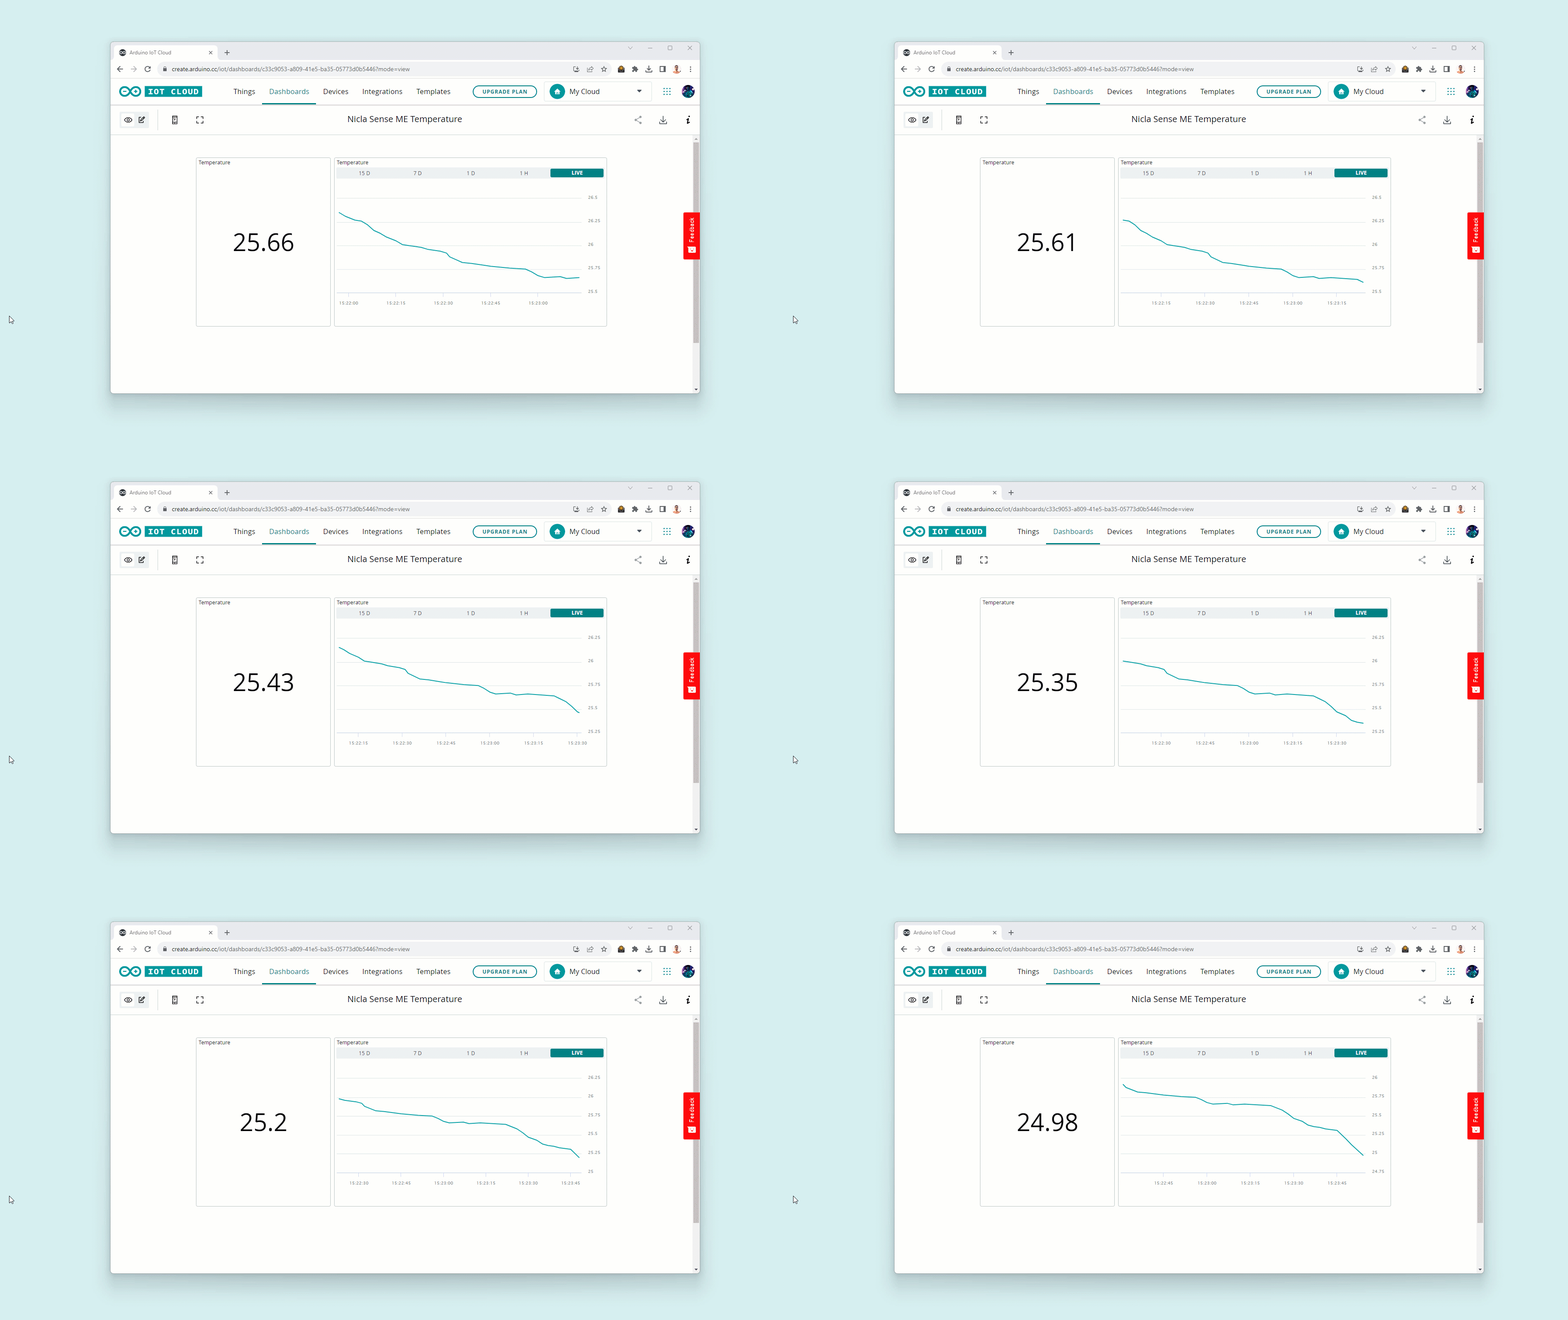
Finally, after searching for and connecting to your Wi-Fi® network, it will gather the temperature information from the Nicla Sense ME. Every 2 seconds it will forward it to the Cloud where we can monitor it from anywhere in the world and from any device.
Bluetooth® Low Energy Connection
For Bluetooth® communication, substitute the line of code
BHY2Host.begin(false, NICLA_VIA_ESLOV);BHY2Host.begin(false, NICLA_VIA_BLE);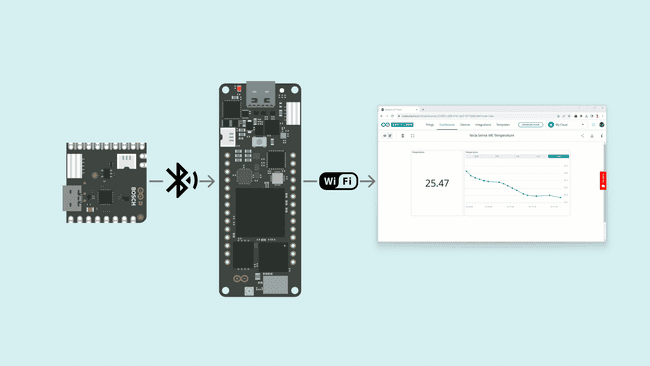
Using the Nicla Sense ME as an MKR Shield
Another way to communicate the Nicla Sense ME with a Portenta C33/H7 is by using it as a shield.
To convert the Nicla Sense ME into a Shield, you will have to solder 2 rows of headers: one side has 9 pins and the other 8 pins; the long side of the headers needs to be on the battery connectors side.
The host (Portenta C33/H7) will communicate through the BHY2Host library with the Nicla Sense ME (both devices communicate over I2C).
To the Nicla Sense ME to communicate with the Arduino Cloud, set the communication method as
NICLA_AS_SHIELDBHY2Host.begin(false, NICLA_AS_SHIELD);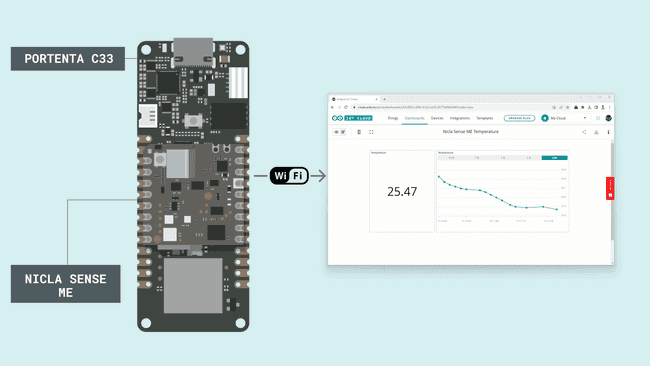
This setup works with the ESLOV cable too. Keep in mind that female headers or raw cables can be used as well, but make sure the connection of the pin matches the MKR pinout (3V3, GND, SCL and SDA).
For a more detailed process on how to connect the Nicla Sense ME to the Arduino Cloud, follow this guide
Support
If you encounter any issues or have questions while working with the Nicla Sense ME, we provide various support resources to help you find answers and solutions.
Help Center
Explore our Help Center, which offers a comprehensive collection of articles and guides for the Nicla Sense ME. The Arduino Help Center is designed to provide in-depth technical assistance and help you make the most of your device.
Forum
Join our community forum to connect with other Nicla Sense ME users, share your experiences, and ask questions. The forum is an excellent place to learn from others, discuss issues, and discover new ideas and projects related to the Nicla Sense ME.
Contact Us
Please get in touch with our support team if you need personalized assistance or have questions not covered by the help and support resources described before. We're happy to help you with any issues or inquiries about the Nicla Sense ME.
Suggest changes
The content on docs.arduino.cc is facilitated through a public GitHub repository. If you see anything wrong, you can edit this page here.
License
The Arduino documentation is licensed under the Creative Commons Attribution-Share Alike 4.0 license.