Mouse Controller
Use the Arduino Due as a USB host for a mouse.
Introduction
The Arduino Due has the ability to act as a USB host for peripherals such as mice connected to the SerialUSB port. This example demonstrates the use of the MouseController library.
Goals
- Learn how to use the Arduino Due as a USB host for a mouse.
Hardware & Software Needed
Arduino Due Board
USB mouse
The Circuit
There is no circuit for this tutorial. Simply connect your Arduino Due with the desired USB mouse.
Programming the Board
1. First, let's make sure we have correct the drivers installed. If we are using the Web Editor, we do not need to install anything. If we are using an offline editor, we need to install it manually. This can be done by navigating to Tools > Board > Board Manager.... Here we need to look for the Arduino SAM boards (32-bits ARM Cortex-M3) and install it.
2. Now, we need to install the libraries needed. Simply go to Tools > Manage libraries... and search for USBHost and install it.
The sketch can be found in the snippet below. Upload the sketch to the board.
Code
Before we begin, let's take a look at some of the core functions in the program:
- USBHost is the base class for all calls that rely on USB host communication. When invoked, it initializes a USB controller.USBHost
- MouseController is the class for all calls to the USBHost relating to an attached mouse.MouseController mouse(usb);
- A function that is called whenever a connected USB mouse moves.mouseMoved()
1/*2
3 Mouse Controller Example4
5 Shows the output of a USB Mouse connected to6
7 the Native USB port on an Arduino Due Board.8
9 created 8 Oct 201210
11 by Cristian Maglie12
13 http://arduino.cc/en/Tutorial/MouseController14
15 This samlple code is part of the public domain.16
17 */18
19// Require mouse control library20#include <MouseController.h>21
22// Initialize USB Controller23
24USBHost usb;25
26// Attach mouse controller to USB27
28MouseController mouse(usb);29
30// variables for mouse button states31boolean leftButton = false;32boolean middleButton = false;33boolean rightButton = false;34
35// This function intercepts mouse movements36void mouseMoved() {37
38 Serial.print("Move: ");39
40 Serial.print(mouse.getXChange());41
42 Serial.print(", ");43
44 Serial.println(mouse.getYChange());45}46
47// This function intercepts mouse movements while a button is pressed48void mouseDragged() {49
50 Serial.print("DRAG: ");51
52 Serial.print(mouse.getXChange());53
54 Serial.print(", ");55
56 Serial.println(mouse.getYChange());57}58
59// This function intercepts mouse button press60void mousePressed() {61
62 Serial.print("Pressed: ");63
64 if (mouse.getButton(LEFT_BUTTON)){65
66 Serial.print("L");67
68 leftButton = true;69
70 }71
72 if (mouse.getButton(MIDDLE_BUTTON)){73
74 Serial.print("M");75
76 middleButton = true;77
78 }79
80 if (mouse.getButton(RIGHT_BUTTON)){81
82 Serial.print("R");83
84 Serial.println();85
86 rightButton = true;87
88 }89}90
91// This function intercepts mouse button release92void mouseReleased() {93
94 Serial.print("Released: ");95
96 if (!mouse.getButton(LEFT_BUTTON) && leftButton==true) {97
98 Serial.print("L");99
100 leftButton = false;101
102 }103
104 if (!mouse.getButton(MIDDLE_BUTTON) && middleButton==true) {105
106 Serial.print("M");107
108 middleButton = false;109
110 }111
112 if (!mouse.getButton(RIGHT_BUTTON) && rightButton==true) {113
114 Serial.print("R");115
116 rightButton = false;117
118 }119
120 Serial.println();121}122
123void setup()124{125
126 Serial.begin(9600);127
128 Serial.println("Program started");129
130 delay(200);131}132
133void loop()134{135
136 // Process USB tasks137
138 usb.Task();139}Testing It Out
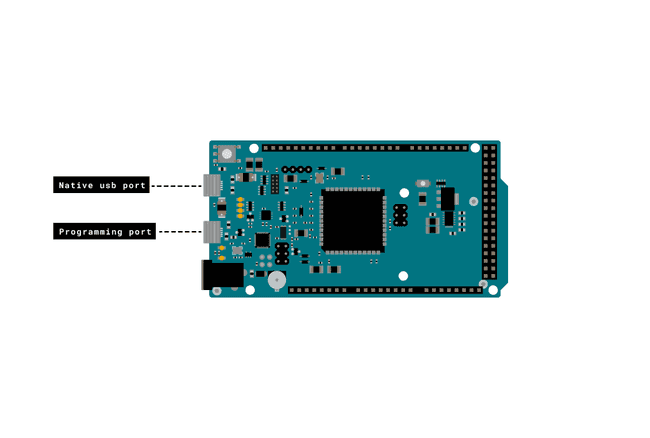
After you have uploaded the code, plug your mouse into the Native USB port on the Due. It enables the Due to emulate a USB mouse or keyboard to an attached computer. In the Arduino IDE, open the serial monitor and start clicking and moving your mouse to see the input!

Troubleshoot
If the code is not working, there are some common issues we can troubleshoot:
- You are using the incorrect USB port
- You have not installed the correct drivers for the Arduino Due.
- You have not installed the USBHost library.
Conclusion
The Arduino Due has a number of facilities for communicating with a computer, another Arduino or other microcontrollers, and different devices like phones, tablets, cameras and so on. In this example, we have learned how to use the Arduino Due as a USB host for a mouse.
Suggest changes
The content on docs.arduino.cc is facilitated through a public GitHub repository. If you see anything wrong, you can edit this page here.
License
The Arduino documentation is licensed under the Creative Commons Attribution-Share Alike 4.0 license.