Serial Call and Response (handshaking)
Send multiple variables using a call-and-response (handshaking) method.
This example demonstrates multi-byte communication from the Arduino board to the computer using a call-and-response (handshaking) method.
This sketch sends an ASCII A (byte of value 65) on startup and repeats that until it gets a serial response from the computer. Then it sends three sensor values as single bytes, and waits for another response from the computer.
You can use the Arduino Software (IDE) serial monitor to view the sent data, or it can be read by Processing (see code below), Flash, PD, Max/MSP (see example below), etc.
Hardware Required
Arduino Board
2 analog sensors (potentiometer, photocell, FSR, etc.)
pushbutton
3 10K ohm resistors
hook-up wires
breadboard
Software Required
Circuit
Connect analog sensors to analog input pin 0 and 1 with 10K ohm resistors used as voltage dividers. Connect a pushbutton or switch to digital I/O pin 2 with a 10K ohm resistor as a reference to ground.

Schematic

Code
1/*2
3 Serial Call and Response4
5 Language: Wiring/Arduino6
7 This program sends an ASCII A (byte of value 65) on startup and repeats that8
9 until it gets some data in. Then it waits for a byte in the serial port, and10
11 sends three sensor values whenever it gets a byte in.12
13 The circuit:14
15 - potentiometers attached to analog inputs 0 and 116
17 - pushbutton attached to digital I/O 218
19 created 26 Sep 200520
21 by Tom Igoe22
23 modified 24 Apr 201224
25 by Tom Igoe and Scott Fitzgerald26
27 Thanks to Greg Shakar and Scott Fitzgerald for the improvements28
29 This example code is in the public domain.30
31 https://www.arduino.cc/en/Tutorial/SerialCallResponse32
33*/34
35int firstSensor = 0; // first analog sensor36int secondSensor = 0; // second analog sensor37int thirdSensor = 0; // digital sensor38int inByte = 0; // incoming serial byte39
40void setup() {41
42 // start serial port at 9600 bps:43
44 Serial.begin(9600);45
46 while (!Serial) {47
48 ; // wait for serial port to connect. Needed for native USB port only49
50 }51
52 pinMode(2, INPUT); // digital sensor is on digital pin 253
54 establishContact(); // send a byte to establish contact until receiver responds55}56
57void loop() {58
59 // if we get a valid byte, read analog ins:60
61 if (Serial.available() > 0) {62
63 // get incoming byte:64
65 inByte = Serial.read();66
67 // read first analog input, divide by 4 to make the range 0-255:68
69 firstSensor = analogRead(A0) / 4;70
71 // delay 10ms to let the ADC recover:72
73 delay(10);74
75 // read second analog input, divide by 4 to make the range 0-255:76
77 secondSensor = analogRead(1) / 4;78
79 // read switch, map it to 0 or 255L80
81 thirdSensor = map(digitalRead(2), 0, 1, 0, 255);82
83 // send sensor values:84
85 Serial.write(firstSensor);86
87 Serial.write(secondSensor);88
89 Serial.write(thirdSensor);90
91 }92}93
94void establishContact() {95
96 while (Serial.available() <= 0) {97
98 Serial.print('A'); // send a capital A99
100 delay(300);101
102 }103}104
105/* Processing sketch to run with this example:106
107 // This example code is in the public domain.108
109 import processing.serial.*;110
111 int bgcolor; // Background color112
113 int fgcolor; // Fill color114
115 Serial myPort; // The serial port116
117 int[] serialInArray = new int[3]; // Where we'll put what we receive118
119 int serialCount = 0; // A count of how many bytes we receive120
121 int xpos, ypos; // Starting position of the ball122
123 boolean firstContact = false; // Whether we've heard from the microcontroller124
125 void setup() {126
127 size(256, 256); // Stage size128
129 noStroke(); // No border on the next thing drawn130
131 // Set the starting position of the ball (middle of the stage)132
133 xpos = width / 2;134
135 ypos = height / 2;136
137 // Print a list of the serial ports for debugging purposes138
139 // if using Processing 2.1 or later, use Serial.printArray()140
141 println(Serial.list());142
143 // I know that the first port in the serial list on my Mac is always my FTDI144
145 // adaptor, so I open Serial.list()[0].146
147 // On Windows machines, this generally opens COM1.148
149 // Open whatever port is the one you're using.150
151 String portName = Serial.list()[0];152
153 myPort = new Serial(this, portName, 9600);154
155 }156
157 void draw() {158
159 background(bgcolor);160
161 fill(fgcolor);162
163 // Draw the shape164
165 ellipse(xpos, ypos, 20, 20);166
167 }168
169 void serialEvent(Serial myPort) {170
171 // read a byte from the serial port:172
173 int inByte = myPort.read();174
175 // if this is the first byte received, and it's an A, clear the serial176
177 // buffer and note that you've had first contact from the microcontroller.178
179 // Otherwise, add the incoming byte to the array:180
181 if (firstContact == false) {182
183 if (inByte == 'A') {184
185 myPort.clear(); // clear the serial port buffer186
187 firstContact = true; // you've had first contact from the microcontroller188
189 myPort.write('A'); // ask for more190
191 }192
193 }194
195 else {196
197 // Add the latest byte from the serial port to array:198
199 serialInArray[serialCount] = inByte;200
201 serialCount++;202
203 // If we have 3 bytes:204
205 if (serialCount > 2 ) {206
207 xpos = serialInArray[0];208
209 ypos = serialInArray[1];210
211 fgcolor = serialInArray[2];212
213 // print the values (for debugging purposes only):214
215 println(xpos + "\t" + ypos + "\t" + fgcolor);216
217 // Send a capital A to request new sensor readings:218
219 myPort.write('A');220
221 // Reset serialCount:222
223 serialCount = 0;224
225 }226
227 }228
229 }230
231*/232
233/* Max/MSP version 5 patch to run with this example:234
235----------begin_max5_patcher----------236
2373908.3oc6ckziiaiE9b0+J3XjCIXpp.WzZNMURv.jCInQ5fYNjNngrDssRKK238
2394nkp6JA4+973hrkrsjncKu0SRiXasQ83G+dKj7QV+4qtaxzrOxKlf9Zzuft6240
241t+7U2cm7ThSbm936lrL3igIAExaaRJ+CYS+sI2qtTI+ikxSuBMKNojm+N3D4242
243Aua5KkPwpuoUAkgKhSm+tbdXo5cQXVOhuGwrohuHD4WT7iXzupen3HY4BuqG244
245rH0kzrrzxzfkb4kdJONHo9JoUKiSS3kRgjt4jYUk0mkznPJh+CYgHewpSqty246
247xWVwUh3jIqkEYEfmqQEMr.ETbB+YddQbVZix+tIAqV03z203QDX4ukIKHm6W248
249ep3T0ovqOUN+435m2Rcx+5U0E+FTzVBh9xOsHXIh5YuADg1x4IYgumG0r3mj250
251shmFmtJmWvSKCJ0um0WNhOKnJo7c6GmZe8YAg7Ne381Rc2j44wQYoBgn0SJN252
253c8qCHH1RhQqJi7NRCVsmGt.pGUESCxE31zDdCV.PRyxRZeo0MU.WOHMdYPIu254
255LVIrT75BMd4p73zxVuHdZ.TFKJByyRRZUTpq77dtRDzZFx+PbT4BYY0DJgaO256
257dUcSvj0XTT7bdQY6yUFLun8YZo71jl0TIt042RYNLa4RfCTWfsznKWDWfJpl258
259tJHrbgV6t.AZInfzWP.4INpJHA8za91u+6QN1nk7hh.PpQwonxEbTAWzpilV260
261MimilkmsDtPbo3TPiUdY0pGa9ZShS4gYUJz1pwE1iwCpxbAgJI9DGGwWNzFT262
263ksLf3z7M0MybG6Hj1WngsD7VEXS8j5q7Wu5U0+39ir8QJJS5GMHdtRimL4m1264
2650e1EVX0YsE2YssINriYRoFRyWVMoRRUGQvnkmms3pnXDYHbBKMPpIOL5i1s8266
2673rMPwFcRCsGRyPH780.8HBnpWz.vlEQBWJ+0CSunehJSmJxiIZRtNGhhDYrU268
269jt3ZQyA2fHJhZDifXIQHUHH8oGYgOREI5nqHIzhFWUndPyBdB3VzHJGwUhkV270
271rgvRl2UCVNMHcd234lf1DN16HFEIdHt99A5hrp7v5WWMSBQZgMP.Tkwoqig8272
273W1.Sn1f3h3nn1wLpBypPDzlJ7XinEGkLiMPloWOhrgR7dpZWJQV1faDy35Qj274
275MThMFkWFGsJChQPqrQp8iorV6Q28HBVF4nMVDJj7f1xyYACFScisg.ruLHOW276
277uMUS4Am4pI4PTnHi.6bi02HNzSYnDBe4cgAgKzRk1jc8PJLoH3Ydz6.Q.7K8278
279tfxx73oUkJq1MGuCy5TpAi.POWZ3AenidLOOIaZPhdjZVW3sdk6LXEGzHb7p280
281Mfr7SEy3SXHyBSxJ3J2ncNNYVJsXG6Me10nj4cfCRFdTFjLo7q3SiCpjjEDM282
283.nvra.GN39.E2CDTHWXPo8.xzfqrHCHKnf5QUYUVdoZPUjCSC7LU8.XtTUXl284
285X8vr51GjwFGLC2AlMdLkU4RiaRrnmJuiudnDk0ZW+9p6TuKBe433JUCzp6fU286
287iOF0SUk2UQYUPNTEkiZubvKa1tsmgL5SCTXGHnnG0CceLpkpR9Rs28IUESWl288
289EwWNKfHlg.zj6Ee7S+nE8A+m9F7Cu40u9gMm+aRp3kYYkKd3GDOz5y+c7b96290
291K9gfvuIK68uNO6g2vUUL80WxihCVFD9vlB30e2SOrmxUb527RZ3nZNrljGrR292
29370vs1J9suWuZ3zaHVdG3RIJLgGj2Gfn6TcGcstEfvtH.hpFLlnBndjOLGQAI294
295z98BXc6yQxghmOn6gZqj0ShPOXhynLOjzCESt+XwE8TxrCvrdXo16rqnLgvb296
297HaFmbh29QD+K0DyNdjDwvzQL.NXpoMvoOBxkger0HwMRQbpbCh91fjjG9Idw298
299prTH9SzaSea5a.GQEPnnh43WNefMlsOgx18n.vgUNO.tKl7tDyI3iHzafJHZ300
301VVNedVEbGgYIY42i93prB0i7B7KT1LnnCiyAiinpBnsPV7OG.tYKfBsrJOkG302
303UG5aq26iJw6GyJ4eM5mEgEKaNQPMEBUp.t8.krplOVTlZdJAW27bjvGK7p2p304
305HQPgLOSJDYv4E9gQBYBjMUselRxDy+4WplIzm9JQAWOEmfb.E364B43CAwp5306
307uRRDEv8hWXprjADMUOYpOg9.bVQpEfhKgGCnAnk.rghBJCdTVICA3sDvAhE5308
309oU4hf67ea5zWPuILqrD8uiK+i477fjHIt9y.V88yy3uMsZUj7wnxGKNAdPx5310
311fAZMErDZOcJU4M01WFQokix.pKa+JE1WacmnKFeYd7b.0PeIzB8Kk+5WIZpB312
313Ejt34KJeHgOCh4HK8Y3QiAkAfs8TRhhOkG7AAGQf0qxyfmQxa+PLb8Ex.2PS314
3154BdO5GB9Hvg+cfJCMofAIMu9Qz+UPCjckqVJlEmyA8Bf.rC6.3hAEuG8TdTU316
317bZljQ0nr1ayIqmTwQYfyRGafZhur5vfuyMSqYNWmtAPwWHalDSuUgT0Bosh.318
319JpAR89Y6Ez5QEfPTQO4J0DHLInIliz8BZV2JfV3Bd36qsQwAVVXbr1BGXp6s320
321Sd5sSDruo74wofx.HxUgxQwTnMLqTXvRmiGh2PUZr5pBynKChjl6feNUjSRn322
323hEUfRPT1GfG9Ik4TQBm.hEZZ.bc38HjAMKGzDRijEm1ifx1dbgzQyKh6FZc3324
325wOCkRJH+KUh0daWs6wzltWx1puXxlWW6NZWY2JiTBzzILRIANku02NourySM326
327VI1VJTvQZff32AJr+dS9e34QAoA6EGXlGFH9yk7yyQAlVd3SR94g+TxOu1sU328
329Flgd6ICI96LzazyPu1cgqsZ8r74SgF.65+efbMf4pGHT7lgHh30Sha3N5Ia.330
331oqjMf7nsuMwycf7iYDybiAAVr3eC.oTMjpzEr8GDRc9bFRGHYXDrzg.Tlx+q332
333NW8TY1IkzCfZ2IftkQstbB08HUezoDS+oFyI.cWIhWBaDiUo7qIrDO7f.L6n334
335AXqCmyNT9act.z+Iv.GR0uES0ZXfjdz.IczAxQOUR+zvRsUTigRxmyPYeNlj336
337yXv8Peef2ZFzuLzWPPeAE8ELzWXYlhe8WzAcUg+b1UkIoCLzIH60zwASGXau338
339a1Dq2nUY.sox4vng+m0nACePngC9lEMLZMBPodOxf+yx5d4uMCTHm3kJvIIG340
341jcLMedEQldkjpoBkQyjY1Hk.hmSY95Iwos8NDb9VSlIWOIntqgxryUjL6bCJ342
343y1lli5tWWxrQ7YmqGYlc6shK1iY2dr0wtNjYxgHyzaq0OznY235awCr8zSz6344
345EGd1QNUKf.74dADTBbTbeotjpW95IolY0WpKYONY8M83Rx2MChx3fL+iG5Mm346
347tXpdmvXj8uTvaAL1WjbbarQD4Z6kXBpnm6a69oKV2PY9WY174IbC3CaRQ9iK348
349Q4sYGQpwdtZ5wFrc7n569.M83OOR5ydSB1ZcAWCxdbKuavz9LILxfD.wWO.W350
351Nq+Zu4Es+AP6s5p9jDWH8ET+c85+XbW0.N1nDCTD7U4DGc6ohnU019fS7kQ0352
353o43luuOGjv5agHp0DT.CysOfgLR3xXlXTUKm16RivRsn3z0O6cl3YScAvtrb354
355hwekGB7BZuqESUzBJWmCvK7t9HF8Ts6cUAPoFWso3aP8ApWyJ3wqOPo2pJDC356
357BQ0NI0Pj8QCQ2r1L5vKaU5lDRYX7yRur1UYYZmJQ9iDHwN9dndB5n5ejflmm358
359UsBwLHnDkKXWRuAkb3NeuzqRstiQGP.fCQFdHNzaE.8u58Nz9svFE9SGIE1X360
361kv9Iwfl1BdNWjA7xcThsWCS847loyFD8pZq2E2F04lYULzBTDYhrFSDDJdjo362
363fisN2NUN26e4xRu51zD5ZseJ4HC63WyIX6jRqsp0jangBnK.Qlo58PCpWevt364
365ahzqK7fbKsdX6R64aao8LmWhBPh9jKVAPMzb5a2cV6opdWHneMmqMEmAGsPh366
367ieigIjV+4gF1GgbMNXg+NH44YaRYyd..S1ThHzKhFwwGRaWVITqyj9FvPqMT368
369d0pDuSqDrOGF.Uogf.juCFi9WAUkYR+rFPanDcPG8SbrtjyG03ZQ8m3AqC5H370
371NcUUoXSwVrqXKVcZu.5ZnkwIfIVdXVZTwAuTTUiYuxwjZDK6ZgnRtYV8tJmP372
373hEcuXgz2Goxyaiw35UkaWbpqtfzD02oUkkYqi.YQbZqIIWrIljFolsdmMKFR374
375wCJ2+DTn.9QlkOld+d9Qy9IJdpLfy05Ik2b8GsG9h8rdm1ZFx1FrmmlA2snw376
377qI9Mcdi2nr6q3Gc87nLawurbw1dda+tMyGJ9HaQmlkGwy6davisMgrkM65oz378
379eulfYCzG46am8tSDK144xV4cEvVMTRXq9CIX8+ALNWb6sttKNkiZetnbz+lx380
381cQnb1Nds2C0tvLNe14hwQtxYbxhqc17qHfamUcZZ3NYSWqjJuiDoizZ+ud2j382
383naRK4k3346IIVdR1kKiQjM39adMamvc6n+Xp36Yf3SIGh3uKbquqs1JksTII384
385kuJ7RrZSFb2Cn9j5a6DT8cMo0iczU+lsYaU8YNVh5k5uzJLU26ZcfuJE6XLY386
3870mcRp9NTCp+L+Ap+in7Xf3b9jFQBLtIY06PbrGhcrU6N00Qlaf9N0+QPo9nS388
389P6qsI7aYNLSNOHpsAxis0ggnZLjYqyyFkdSqinVsPaqSDZaYBZ6c93uLCjGm390
391iCroJVLzU45iNE.pIUfs3TWb.0FejHp9uANr0GcJPTroFDNOHpkIweLnI1QT392
393dHl3P7LhOF3Ahd9rnvLwAMy5JSdNezGlsIsW9mW44r26js+alhxjlkdhN0YE394
395YqiH5MTeWo6D4Qm.ieLS7OynmuVGSbmbFUlnWWhiQlhOeN+Yl35bq.tGo9JR396
397cj8AVqdz7nSgVB9zNj.FTOU68o5d9KO5TUOGxVMw+jTO8T6wqD0hEiHsOJO5398
399TTOMoS.zlqN0SpZjz6GcH05ylVM0jwuidlkmAif374ih5M5QPfccr8Hqifff400
401otN8pt3hUcaWu8nosBhwmD0Epw5KmoF.poxy4YHbnjqfPJqcM3Y2vun7nS.i402
403f3eETiqcRX2LR.4QmhZrkoCSGwzZrqKHrVR8caari+55d2caPqmq5n.ywe8Q404
405WrZL9fpwVXeaogMByE6y1SMdjk+gbavbN7fYvVtt1C2XwHJSzpk+tidUO25H406
407UB9onw9mlFQ10fhpZBaDatcMTTEGcJpwzqg92qqiVtM6Cu0IRQ0ndEdfCAqV408
409l0qYAUmPrctbxO4XCuPMa1asYzKDks1D52ZCne6Mednz9qW8+.vfqkDA410
411-----------end_max5_patcher-----------412
413*/Processing Code
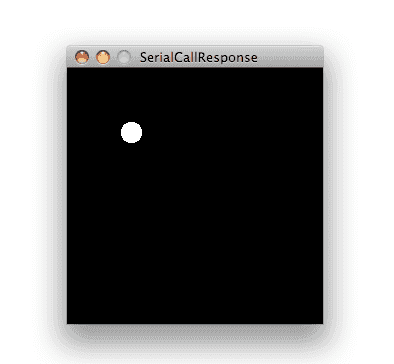
Copy the Processing sketch from the code sample above. As you change the value of the analog sensor, you'll get a ball moving onscreen something like this. The ball will appear only when you push the button:

Max Code
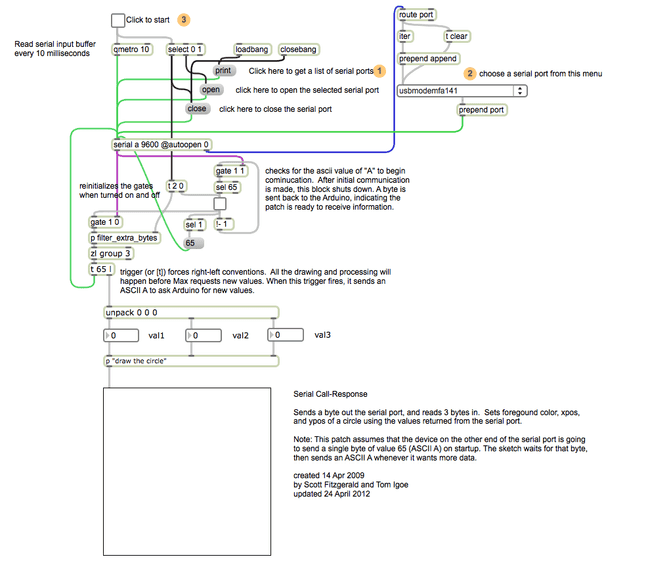
The max patch looks like this. Copy the text from the code sample above.

Learn more
You can find more basic tutorials in the built-in examples section.
You can also explore the language reference, a detailed collection of the Arduino programming language.
Last revision 2015/07/29 by SM
Suggest changes
The content on docs.arduino.cc is facilitated through a public GitHub repository. If you see anything wrong, you can edit this page here.
License
The Arduino documentation is licensed under the Creative Commons Attribution-Share Alike 4.0 license.